In the 10.0.30 release of D365FO, which became generally available on Oct 21st, 2022, Microsoft added the ability for customers to report on the telemetry data of their end users. I wanted to take a quick overview of this feature and look at opportunities to use this data.
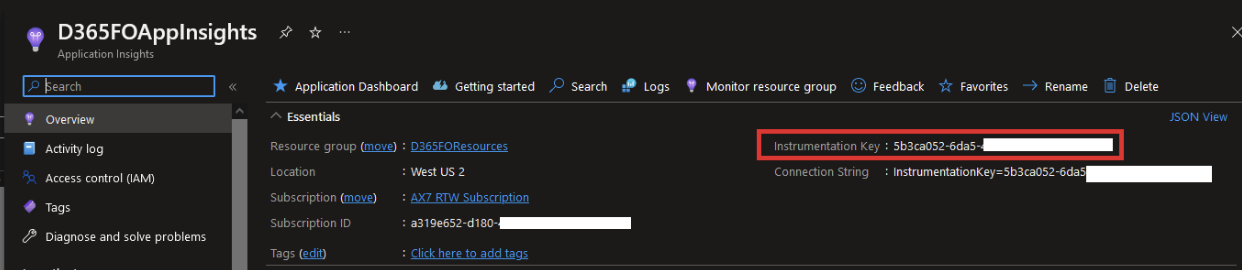
The telemetry data from Microsoft is stored in Azure Application Insights, so we must create a resource for us to store this data. Once created please note the Instrumentation Key as we will need that in subsequent steps.
View fullsize
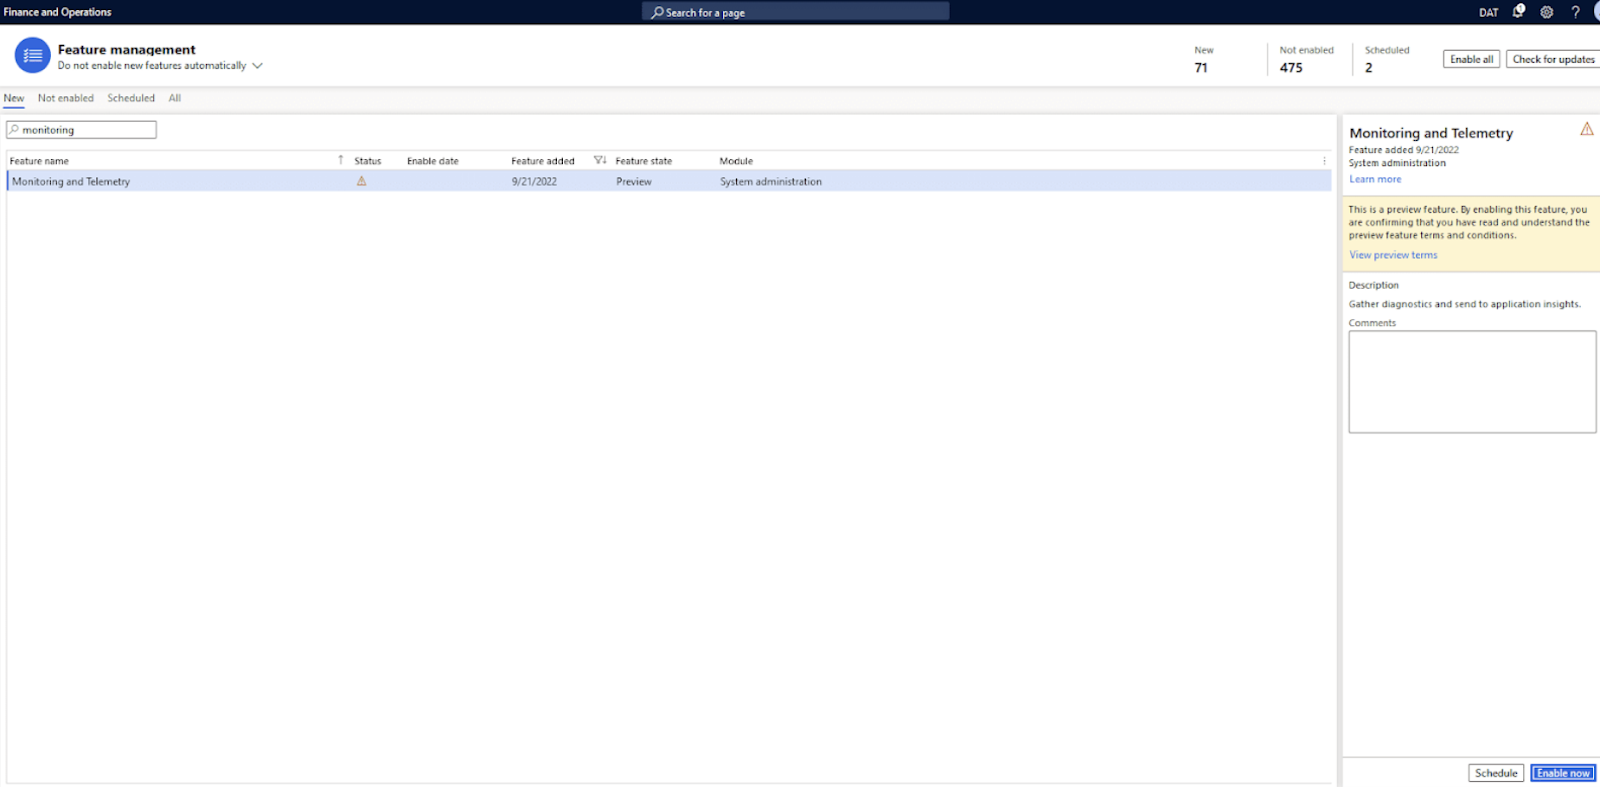
The telemetry feature is labeled as a ‘preview feature’ so it is not enabled by default. That means we need to enable the feature by navigating to System Administration -> Workspaces -> Feature.
Management and search for ‘monitoring and telemetry’. You can see the Status below is marked as the yellow triangle with an exclamation point, indicating it is not enabled.
View fullsize
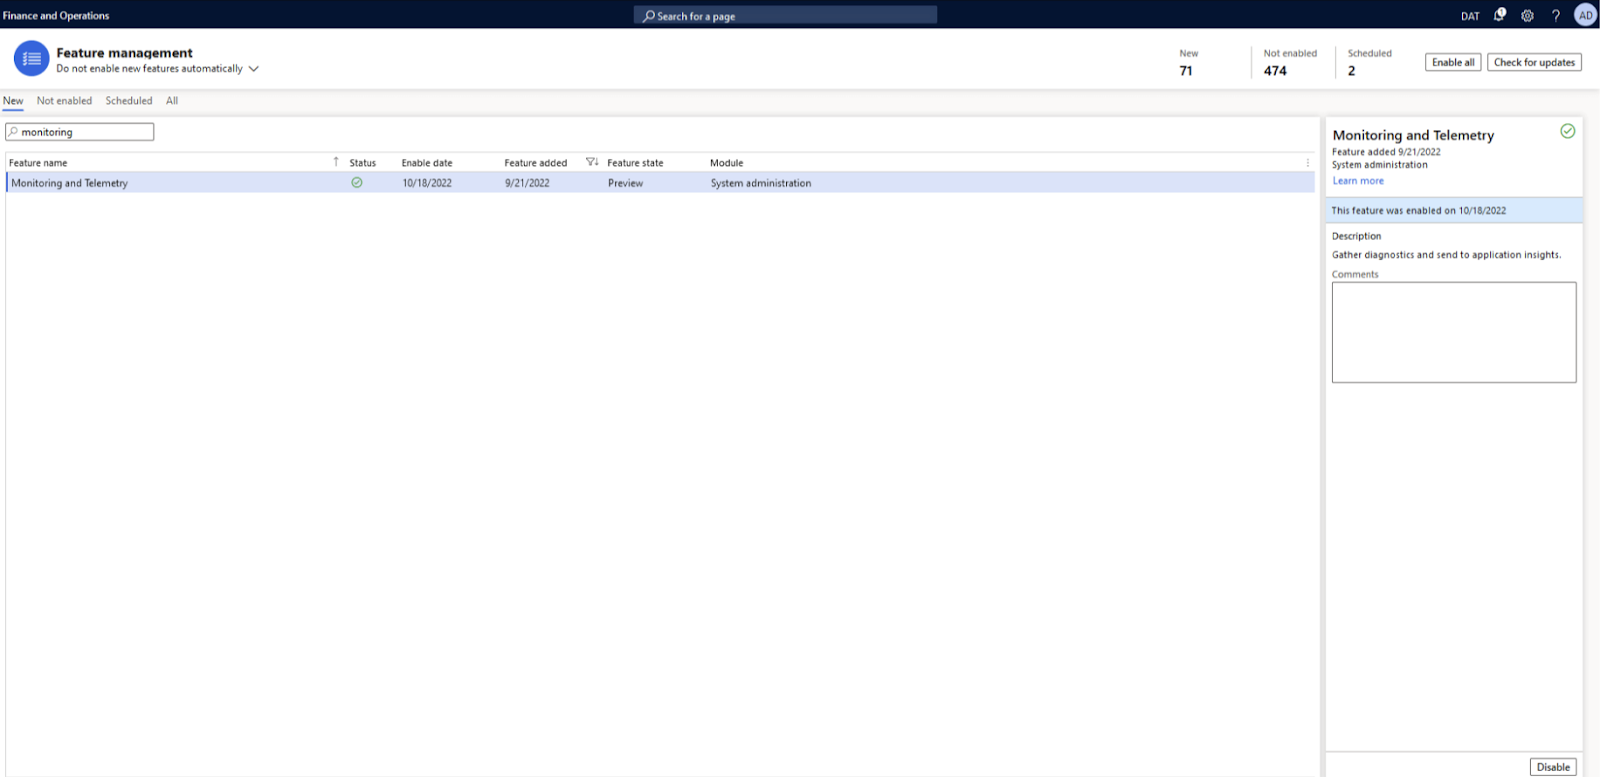
After enabling the feature, you can see the Status change to the green check mark.
View fullsize
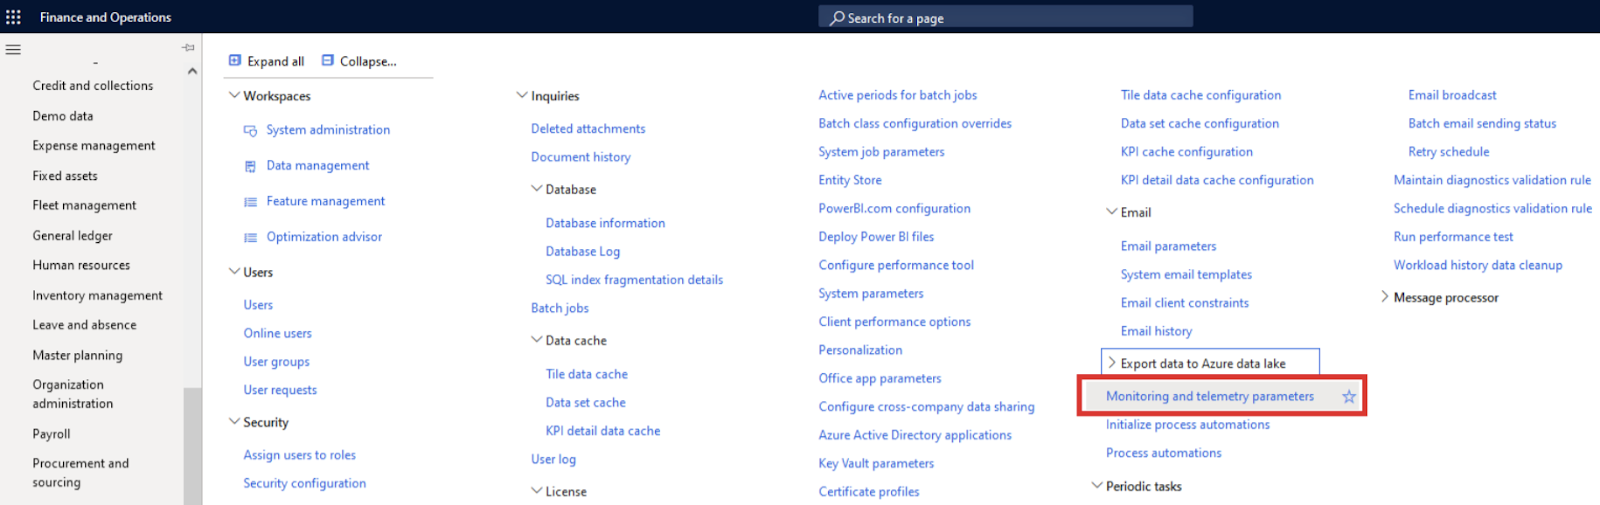
Now we can navigate to System Administration -> Setup -> Monitoring and Telemetry Parameters.
View fullsize
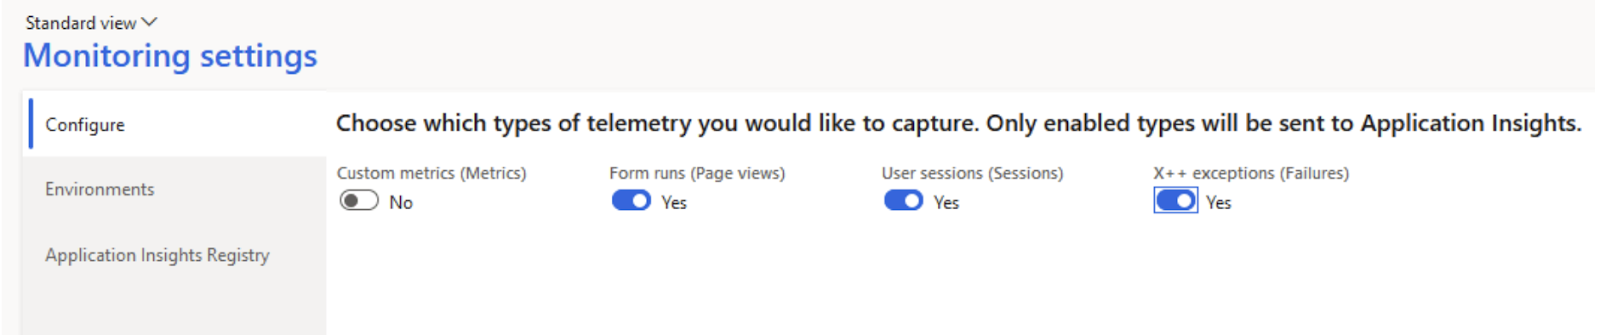
We can now configure which events we want to enable in the Configure tab, specifically for our case we want to enable the Form Runs, User Sessions, and X++ exceptions:
View fullsize
In the Environments tab, the LCS Environment variable is the Instrumentation Key from your Application Insights resource from the previous step. The Environment Mode should be set to whatever environment you want you are connecting to.
View fullsize

In the Application Insights Registry tab, we again will input our Environment Mode and Instrumentation key values.
View fullsize

Once these values are set, the configuration portion for telemetry data is complete.
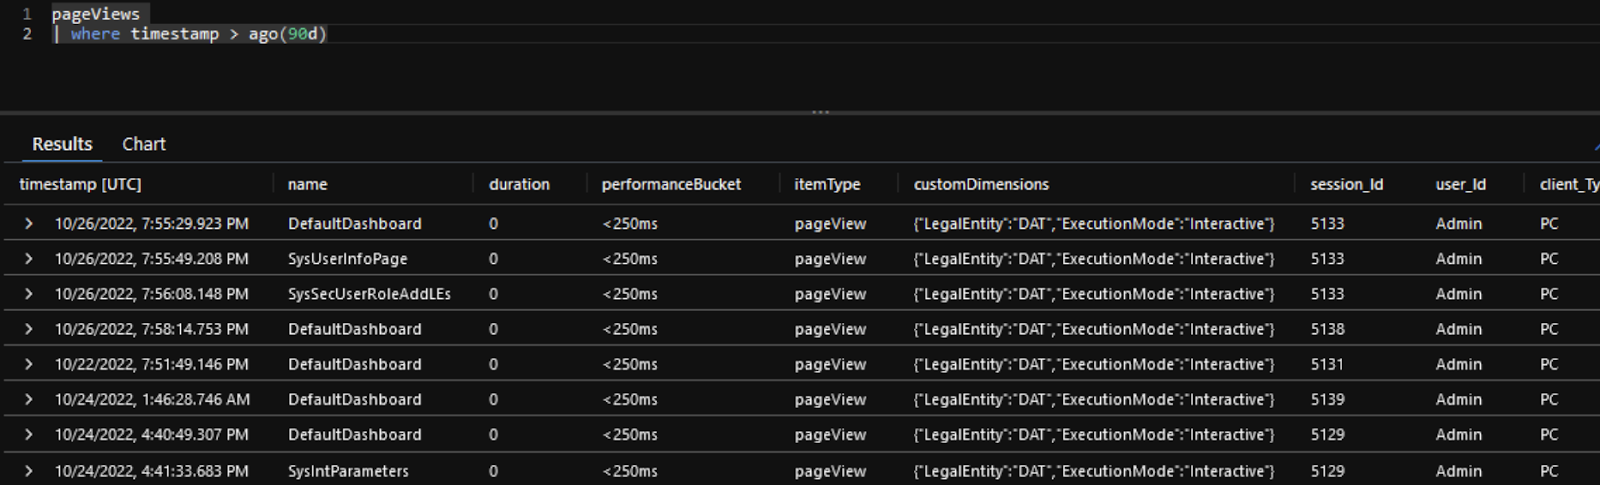
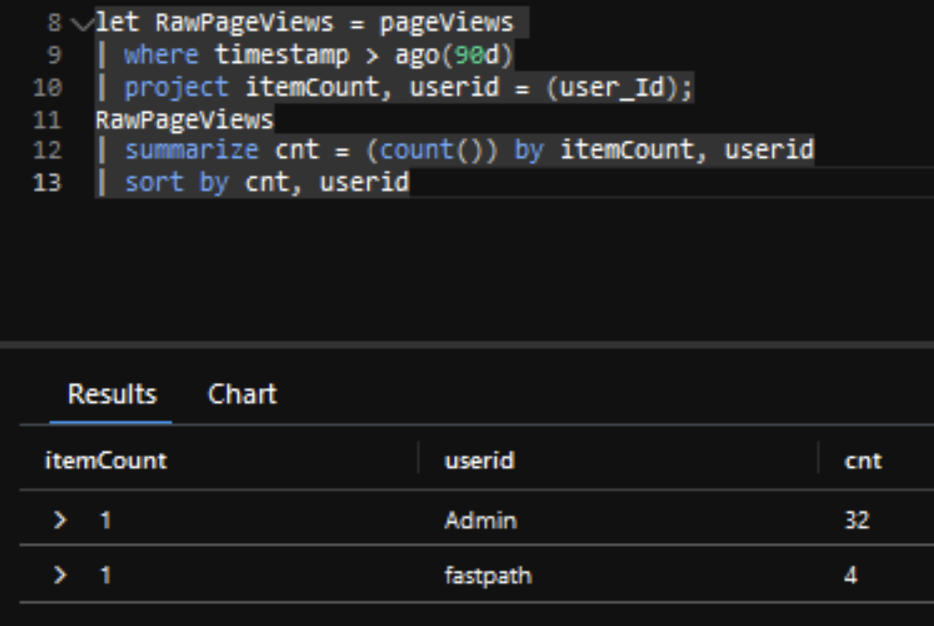
In the Application Insights resource, we created initially within Azure, we can navigate to the Monitoring -> Logs area and see the tables available for us to query. The data in Application Insights can be queried using the Kusto Query Language (KQL). For example, in the screenshot below we can see we can query the ‘pageviews’ table to see all page views from users within the last 90 days.
View fullsize
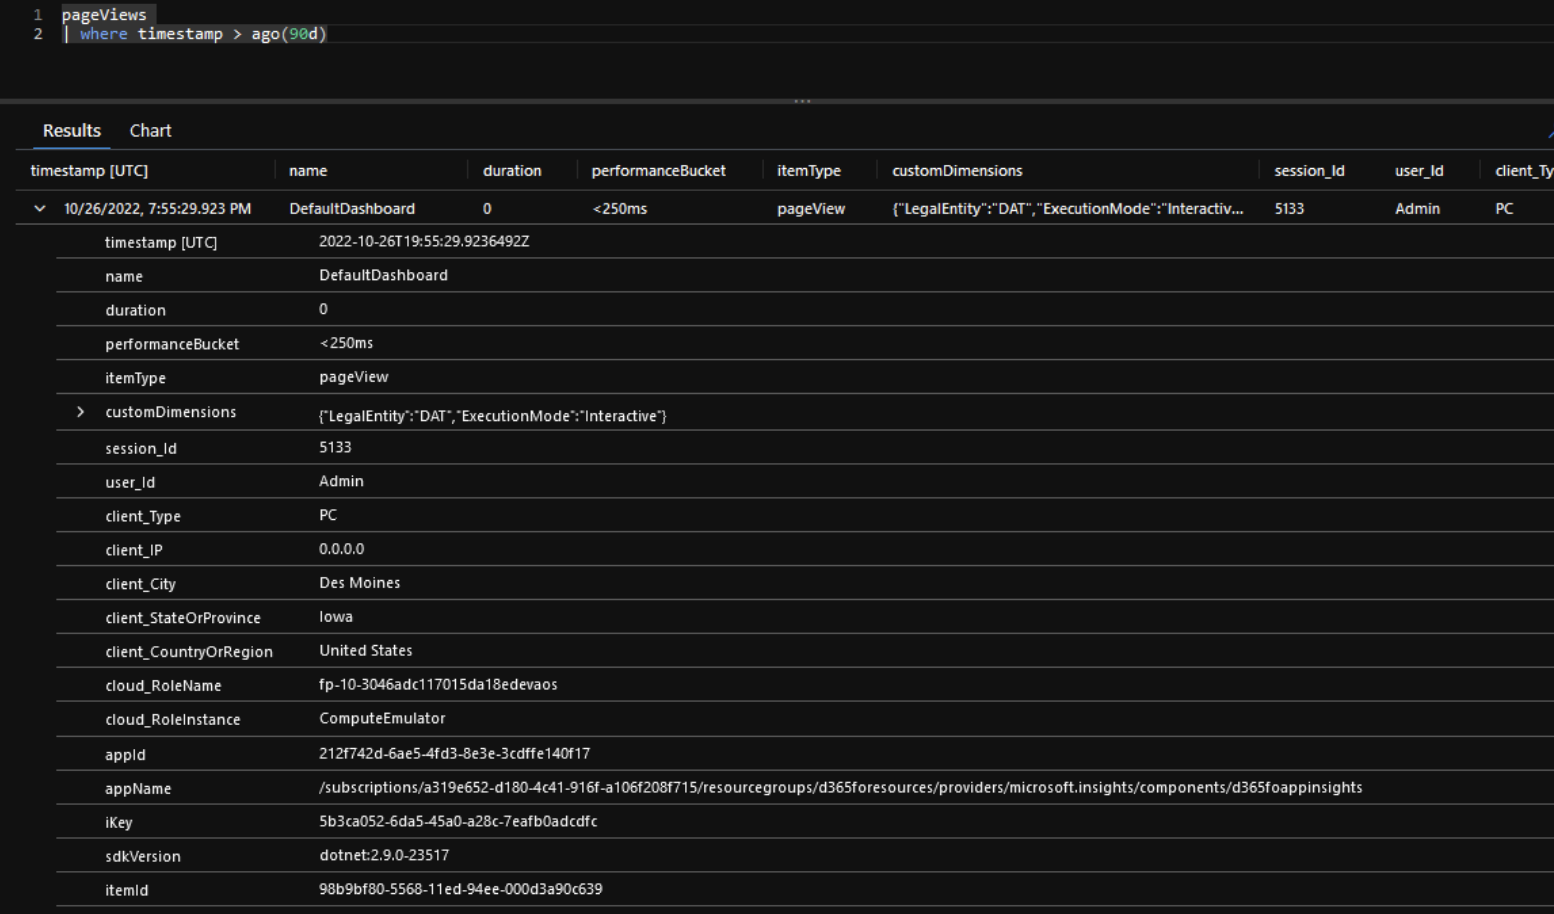
If we take a deeper dive into the data itself we can see we are able to obtain the following from the user interaction:
Note: Some fields do not appear to be populating at this time (duration, client_IP, etc)
View fullsize
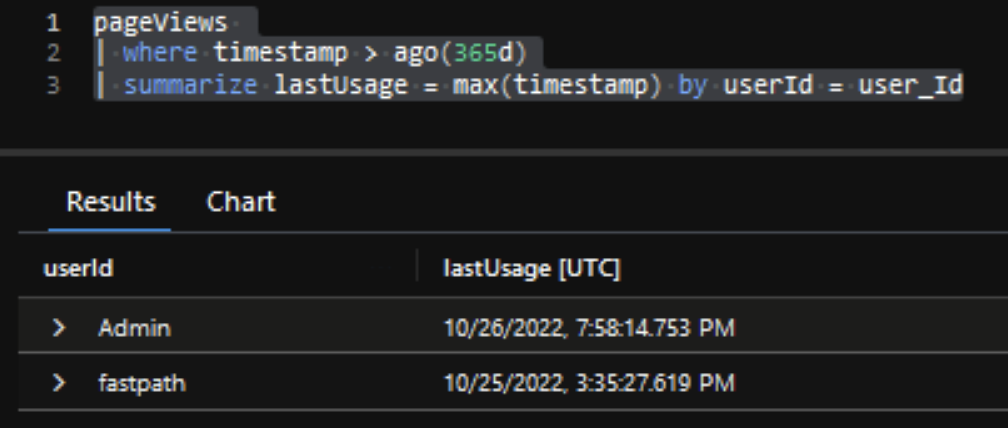
Using the KQL language we can perform business logic on the data, for example, you could use the following query to show the last time a user interacted with D365FO:
View fullsize
Another example would be wanting to see how many menu items a user navigated to over a period of time:
View fullsize
This data can also be exported to Power BI for additional analysis and visualizations. Within Application Insights we can select Export -> Export to Power BI:
View fullsize

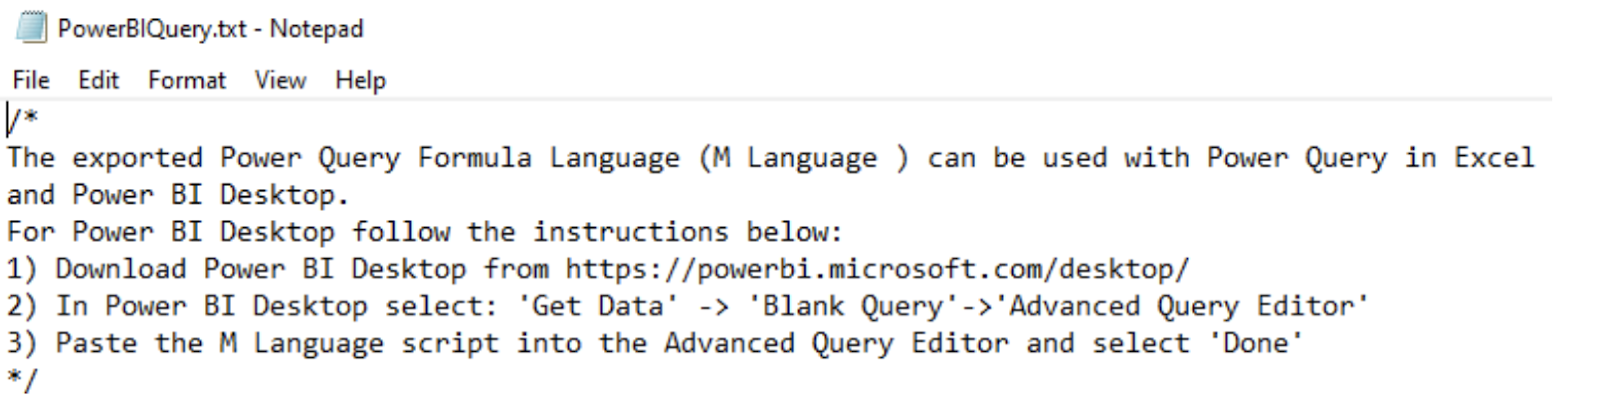
If we choose that option it exports a text file with the following instructions commented out at the top.
View fullsize
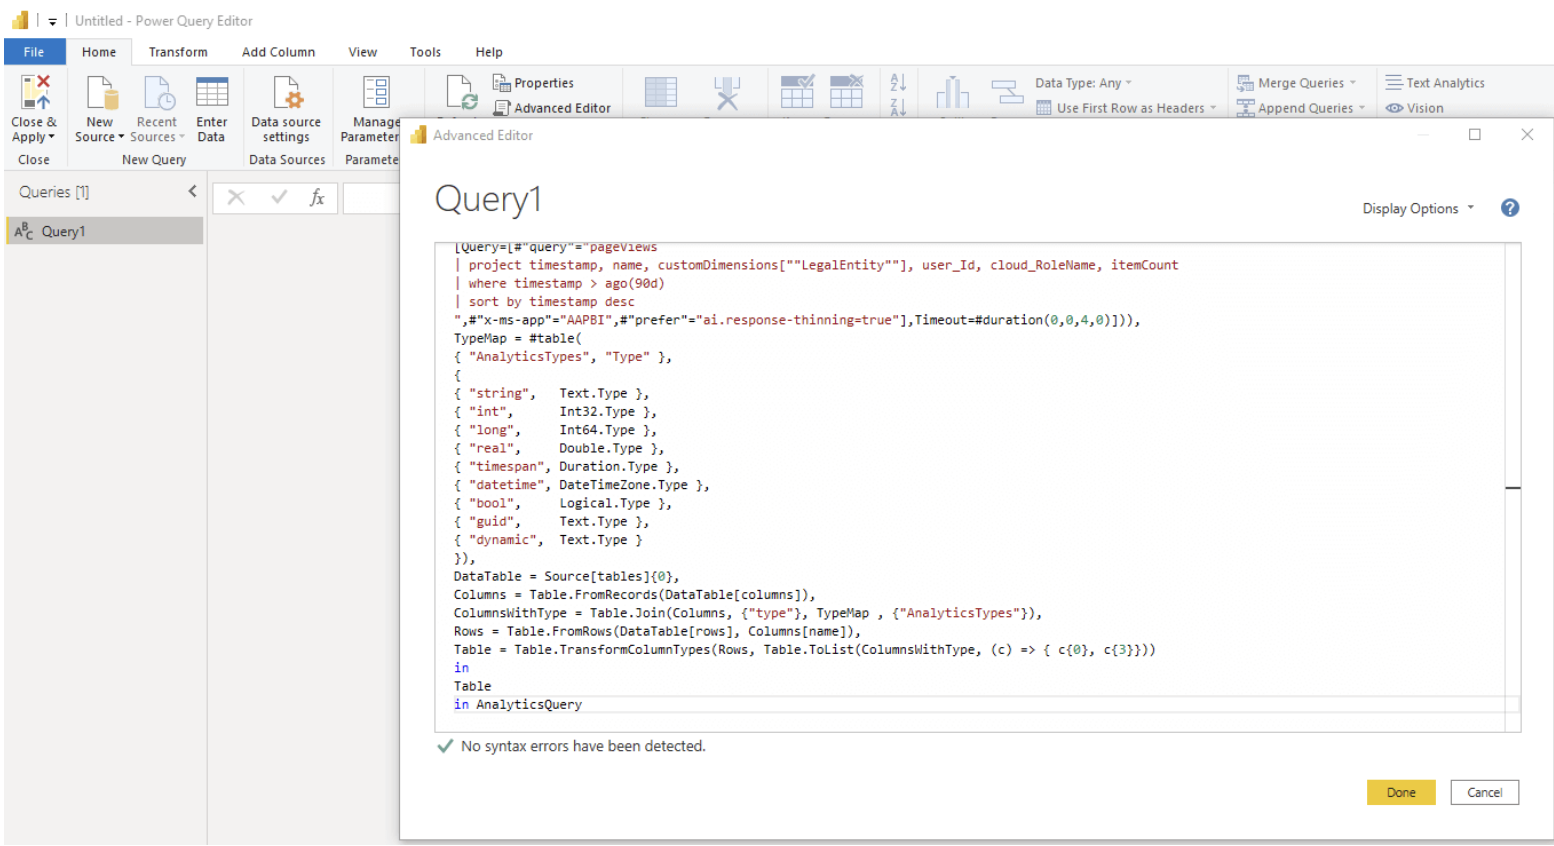
Follow the steps and copy the entire contents into an ‘Advanced Editor’ in PowerBI.
View fullsize
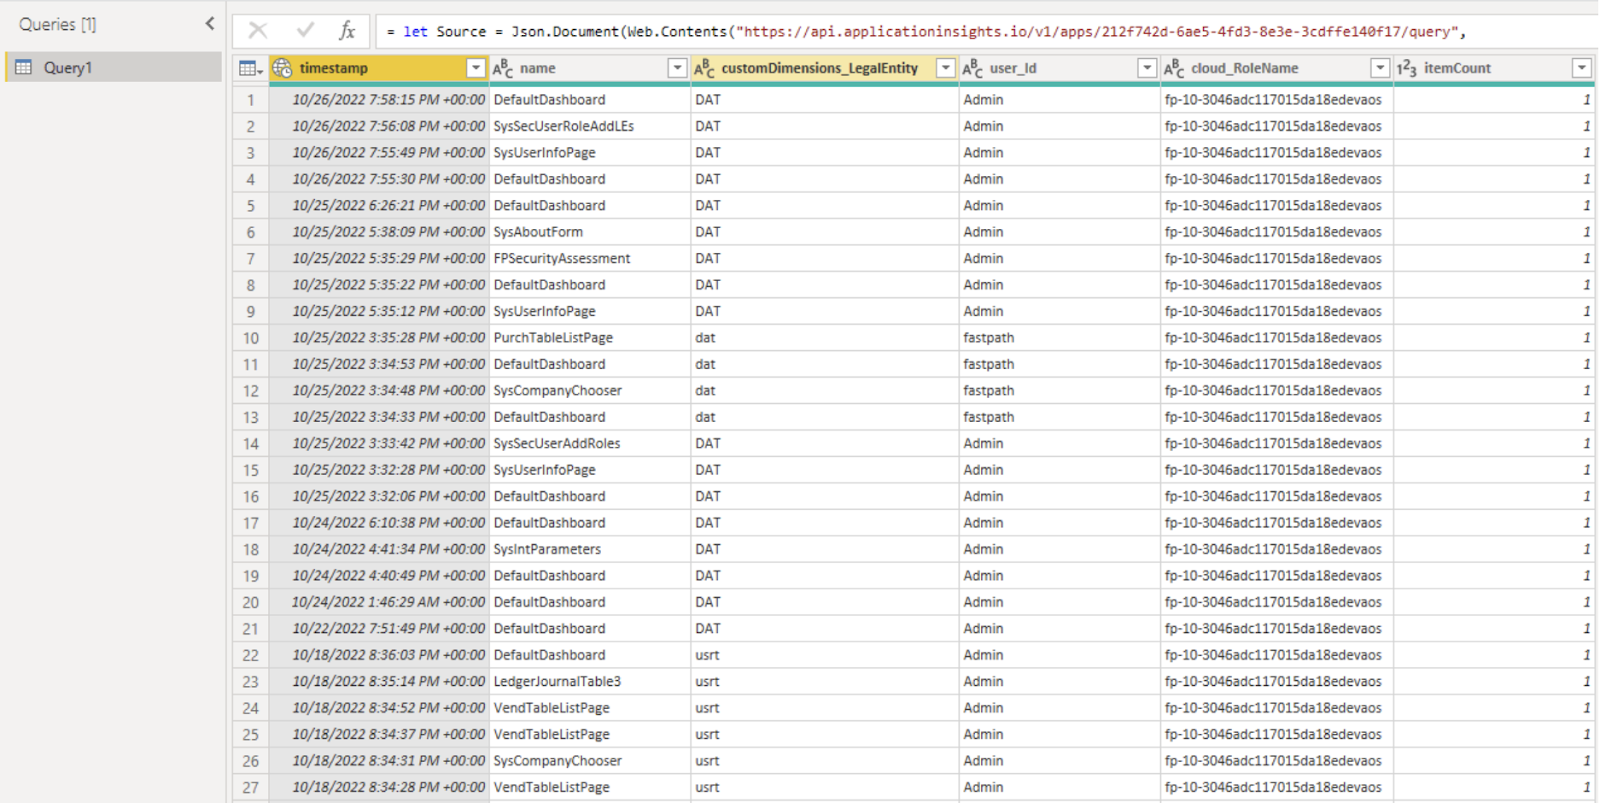
After authenticating, the PageViews table data is successfully pulled into PowerBI.
View fullsize
And we can create different PowerBI visualizations using this data.
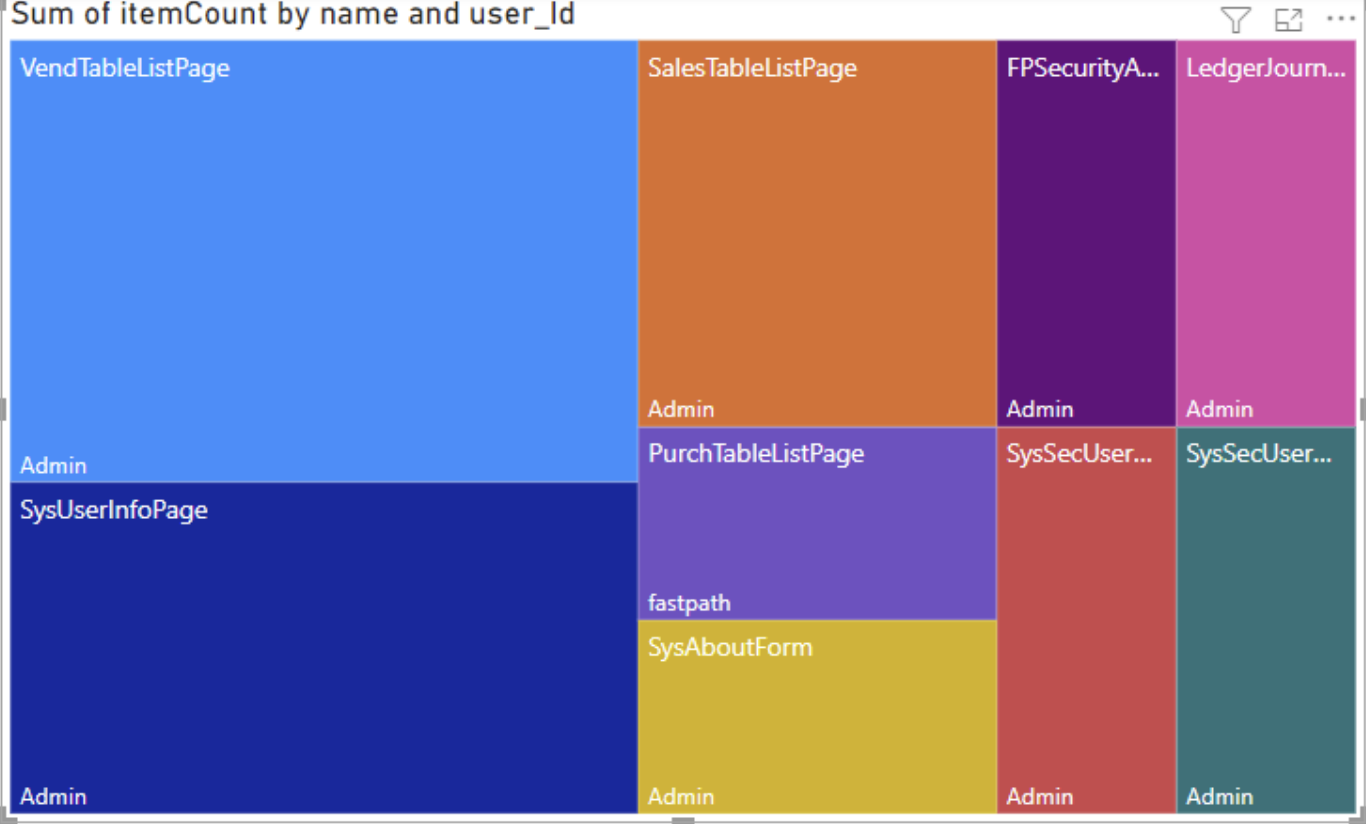
For example, we can create a Treemap of the data which will show the number of times each menu item was visited by each user and will show a colorized weighted view of this data. If we set it up with the following parameters:
View fullsize
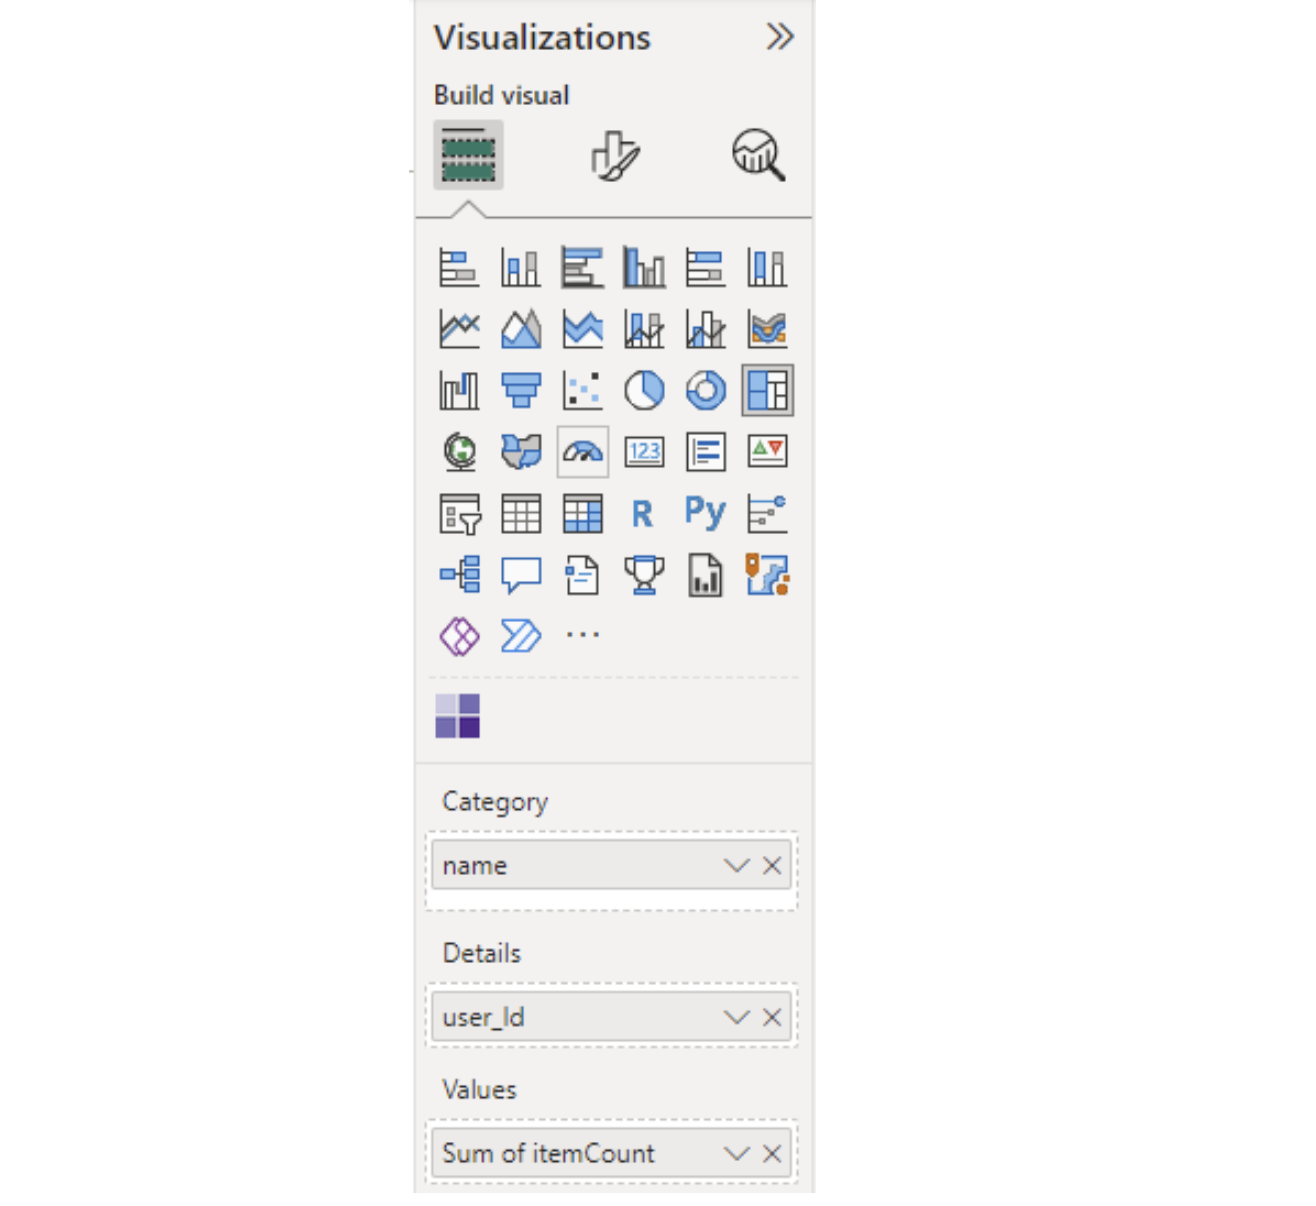
It will generate this visualization output:
View fullsize
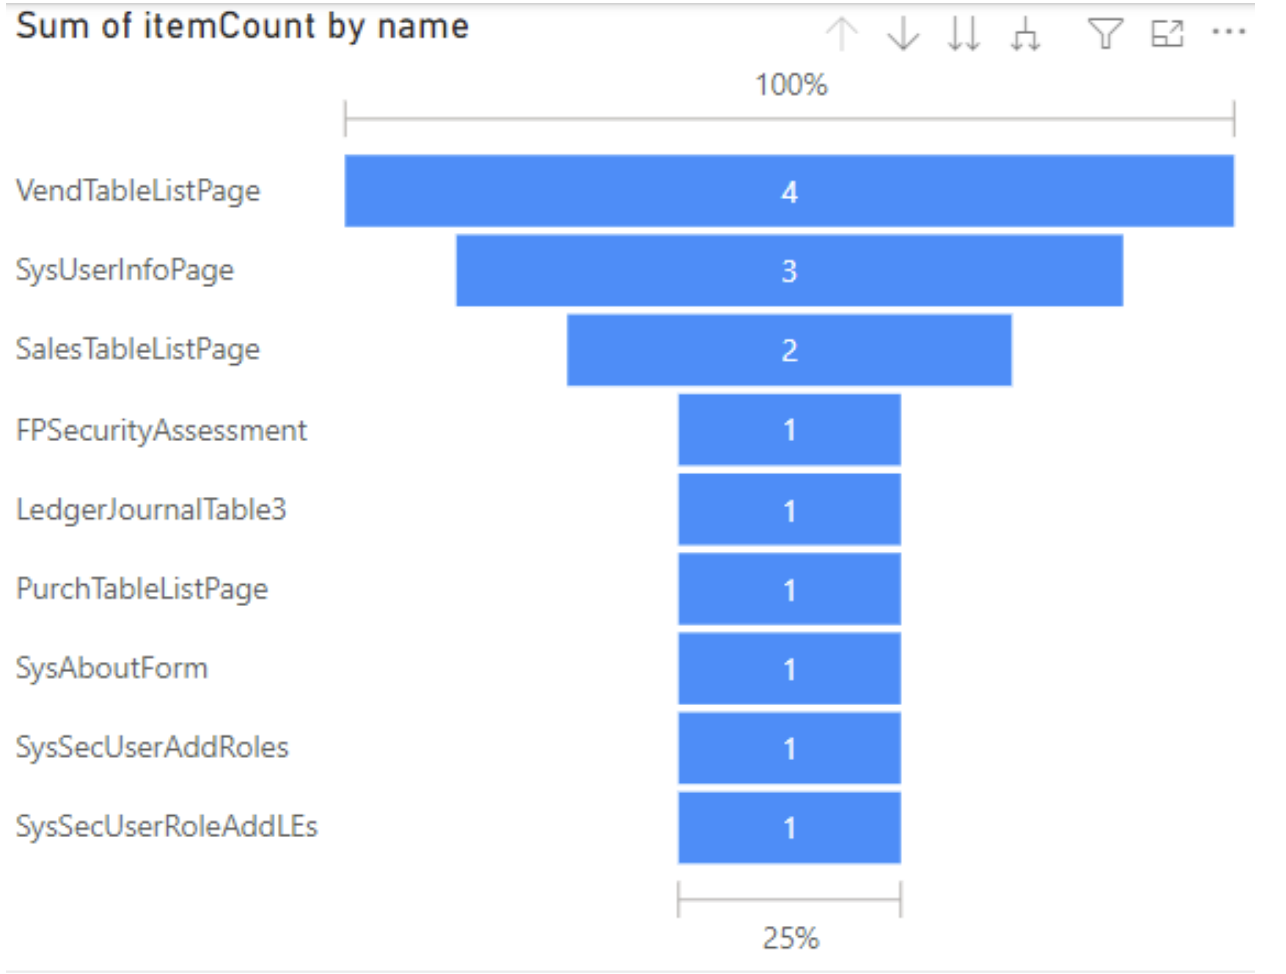
We could also use a Funnel visualization with the following parameters, which would show the number of times each menu item was visited:
View fullsize

And it would generate this visualization output:
View fullsize
And finally, we could utilize a Heatmap visualization to show the same data in a slightly different way. The Heatmap visualization is not enabled by default, so you must click on the 3 dots at the bottom of the Visualization area and go to ‘Get more visuals’
View fullsize
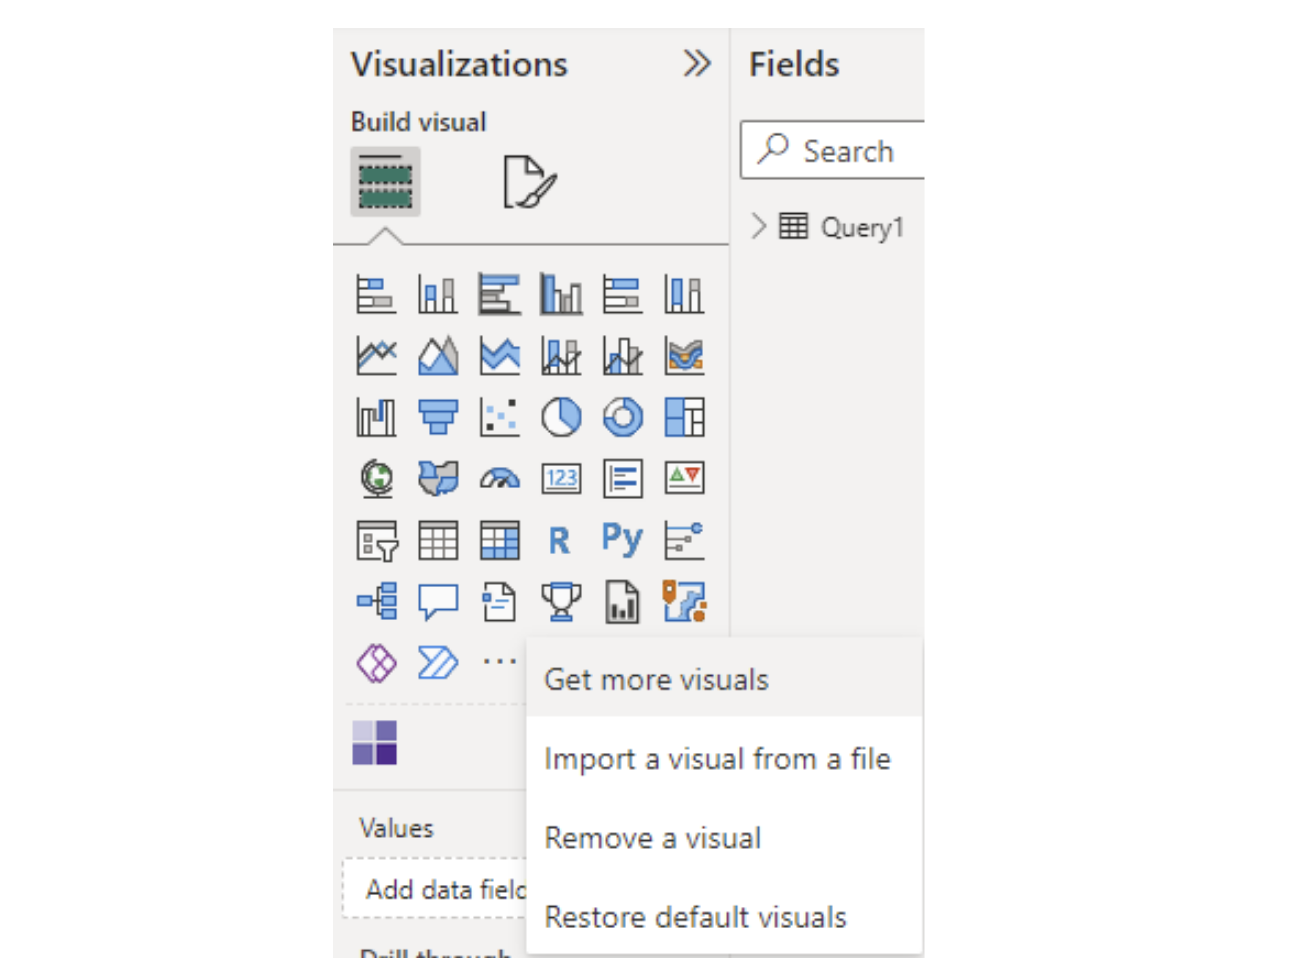
Then search for ‘heatmap’, and select the visualization from Microsoft:
View fullsize
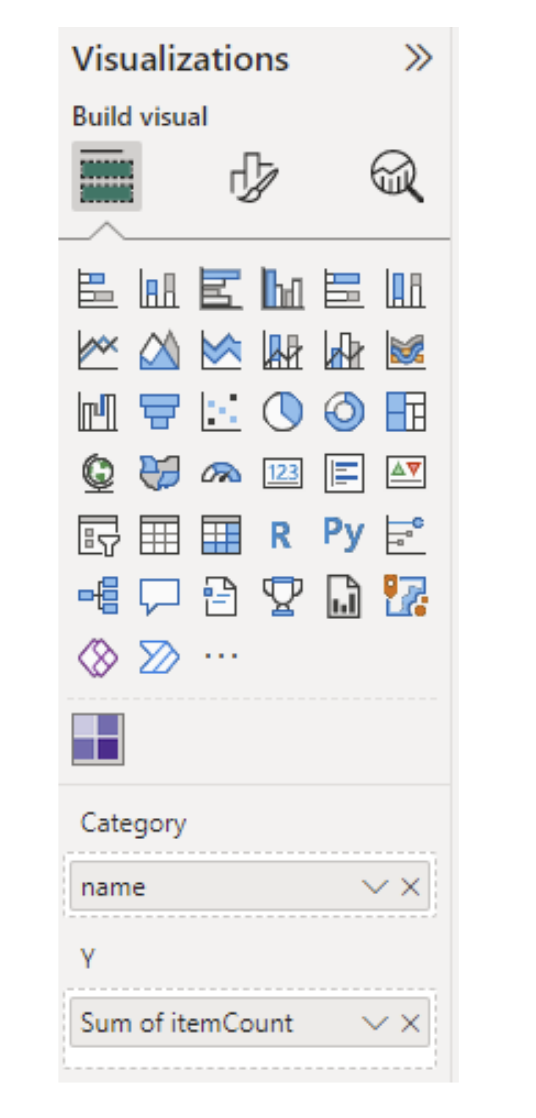
Once downloaded, you can set up the heatmap visualization with the following parameters:
View fullsize
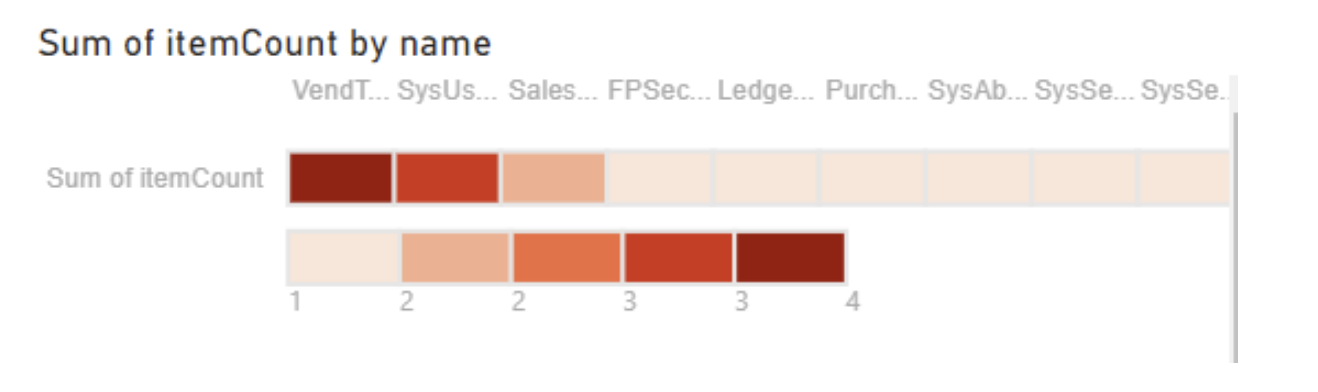
And it will generate the following visualization:
View fullsize
Hopefully, this overview helps to explain how to set up telemetry data from your D365FO instance in Azure AppInsights, how you can query that data, and how to create visualizations from that data for easier consumption and better understanding in Power BI.
User licensing in Dynamics 365 for Finance & Operations is a uniquely complex topic that can be daunting and confusing to most people when they first encounter it. The idea of this blog post is to hopefully clarify how user licensing works and what tools and resources are available to help in your licensing journey!
Licensing is complex within D365FO because it is tied not to what actions a user performs in the system but to what objects that user is assigned in the system. This is somewhat unique in the ERP world as most systems base licensing on what actions a user actually performs (ex: a user with a business license can perform 100 journal entries whereas a professional license lets you perform 1000).
This can lead to scenarios where a user is over-provisioned from a licensing standpoint as a user may be assigned more access than they need to perform their day-to-day operations in the system which causes their licensing requirements to be overinflated.
There are 3 different levels of licenses within D365FO, structured in a hierarchical fashion:
In October 2019, Microsoft made a change to split licensing at the Operations level into the different modules within D365FO. The new licensing SKUs hierarchy looks like this:
Microsoft uses a combination of two different methodologies when determining user licensing. The first is ‘entry point-based licensing’, which looks at the access a user has to entry points (ex: menu items) to determine the license requirements for that user. Each entry point has two different parameters associated with it:
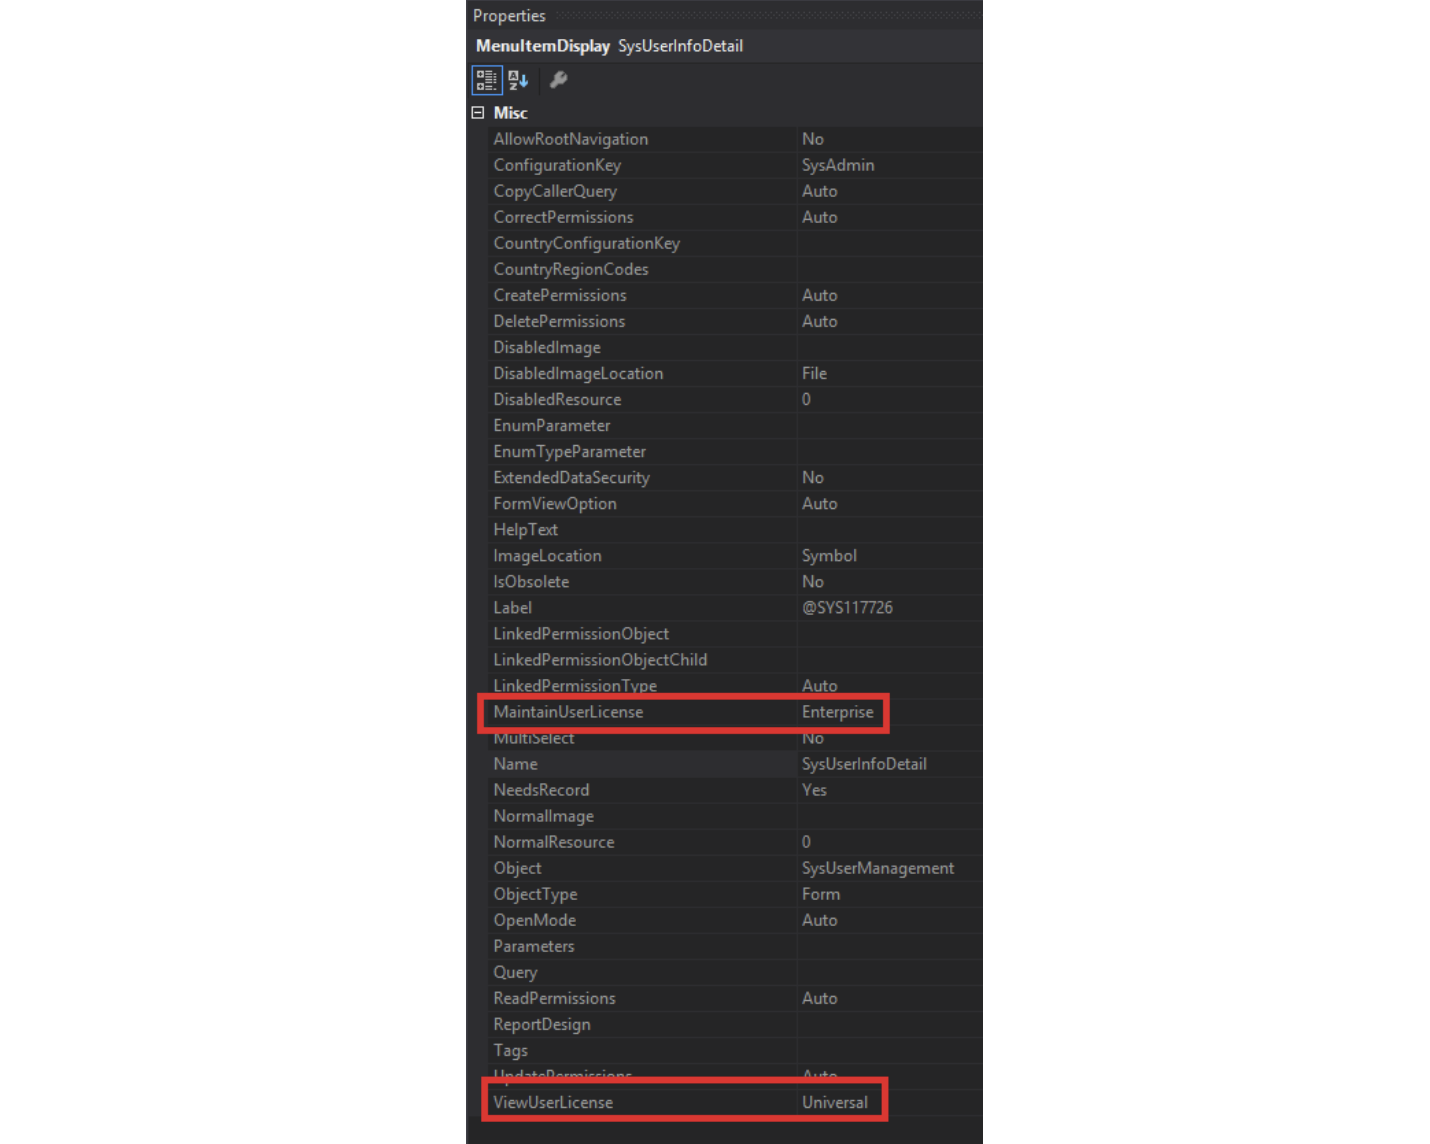
Each of these parameters has a license associated with it. If a user has Read access to the entry point, the license type in the license in the ‘ViewUserLicense’ parameter is required. If the user has Update, Create, or Delete permission to the entry point then the license in the ‘MaintainUserLicense’ parameter is required.
In the example below, a user with Read access to this entry point would need a ‘Team Members’ license (listed as Universal in the AOT). But a user with Update, Create, or Delete access would need an Operations level license (listed as Enterprise in the AOT).
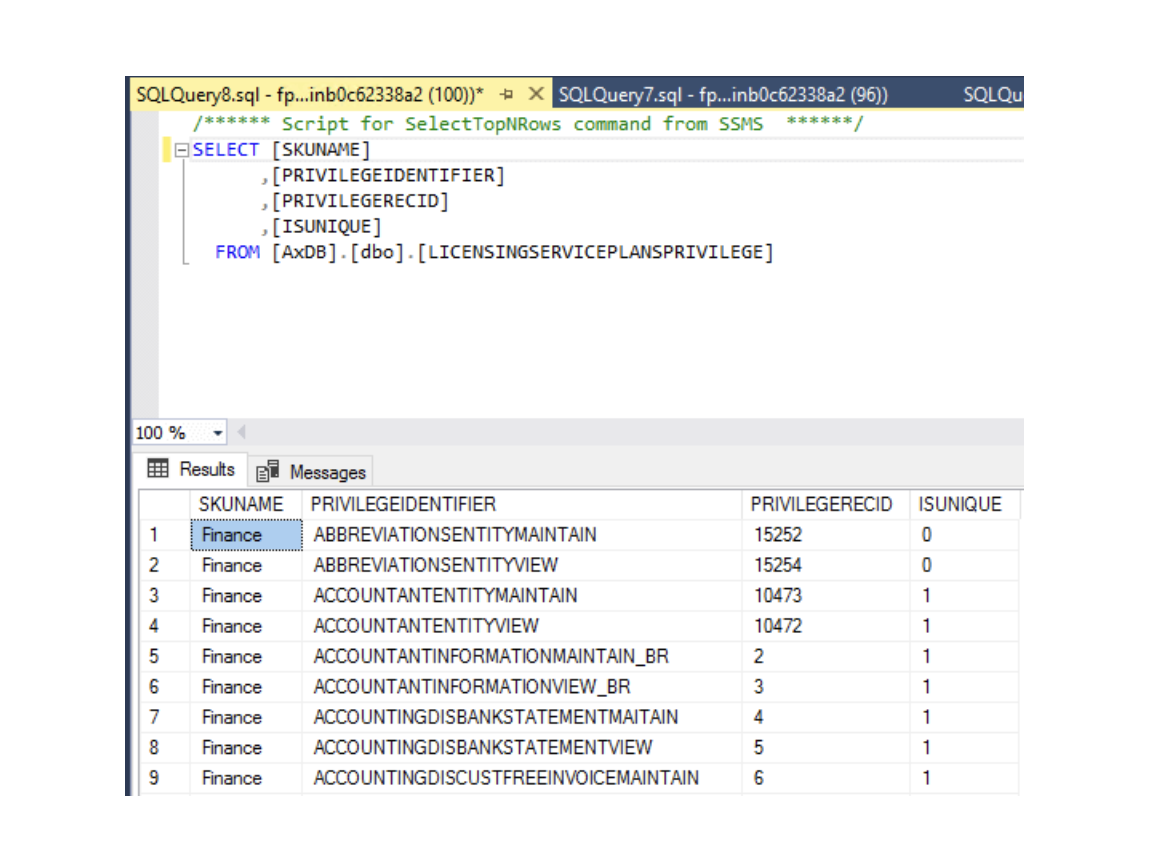
The second licensing methodology used is based on the privileges assigned to a user. This ‘privilege based licensing’ is how Microsoft splits the ‘Operations’ license from the ‘entry point based licensing’ into the different license SKUs.
The privilege to license associations are stored in a database table named ‘LicensingServicePlansPrivilege’:
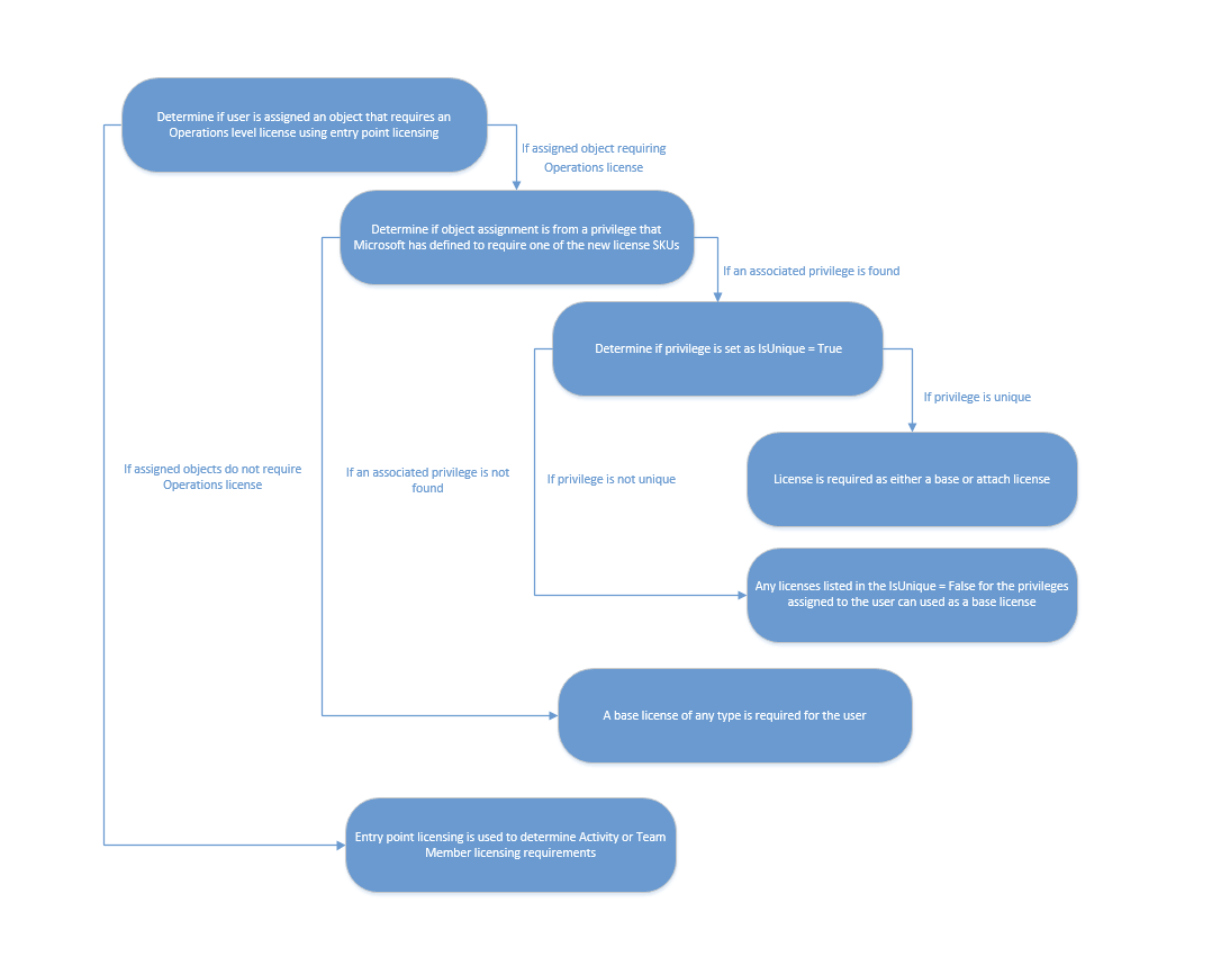
To determine user licensing requirements, we have to combine both the ‘entry point-based licensing’ and the ‘privilege-based licensing’ ideas from above. This is done by first applying ‘entry point based licensing’ to determine if a user requires an Operations, Activity, or Team Members license.
If a user only requires an Activity or Team Members license, that is the license required by the user.
If the user requires an Operations license based on the ‘entry point based licensing’ methodology, then we apply the ‘privilege based licensing’ methodology and look at the privileges the user is assigned to see if there is an entry in the LicensingServicePlansPrivilege to determine the license requirements.
I’ve built a Visio diagram to show the decision tree of user licensing:
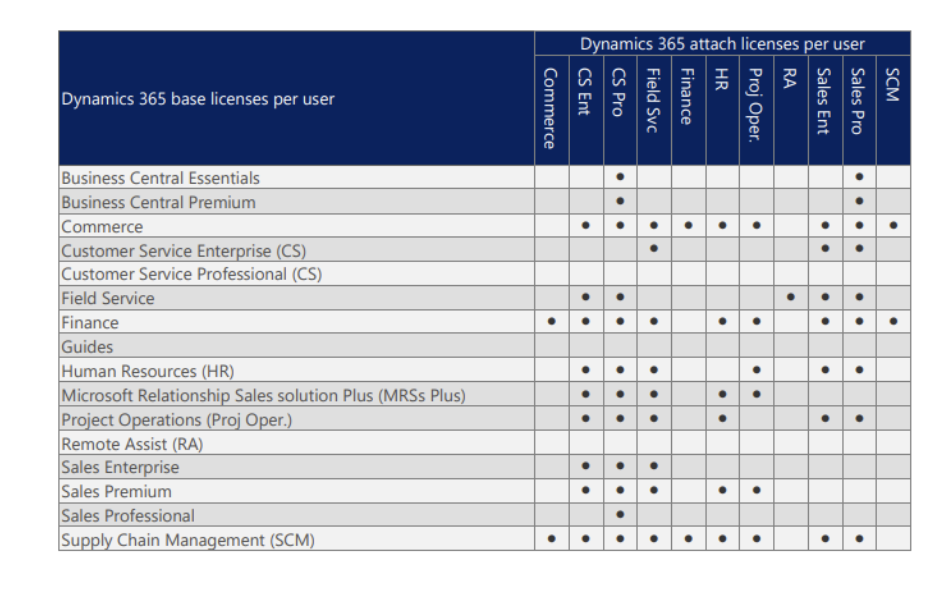
Now that we’ve determined how licenses are determined, what happens if a user needs multiple license SKUs based on their privilege based licensing? Microsoft offers the idea of a ‘base’ and an ‘attach’ license, where a user would assign the first license as a ‘base’ and then would be able to ‘attach’ additional licenses to this.
In the Microsoft Dynamics 365 licensing guide, there is a table that shows the valid base/attach combinations:
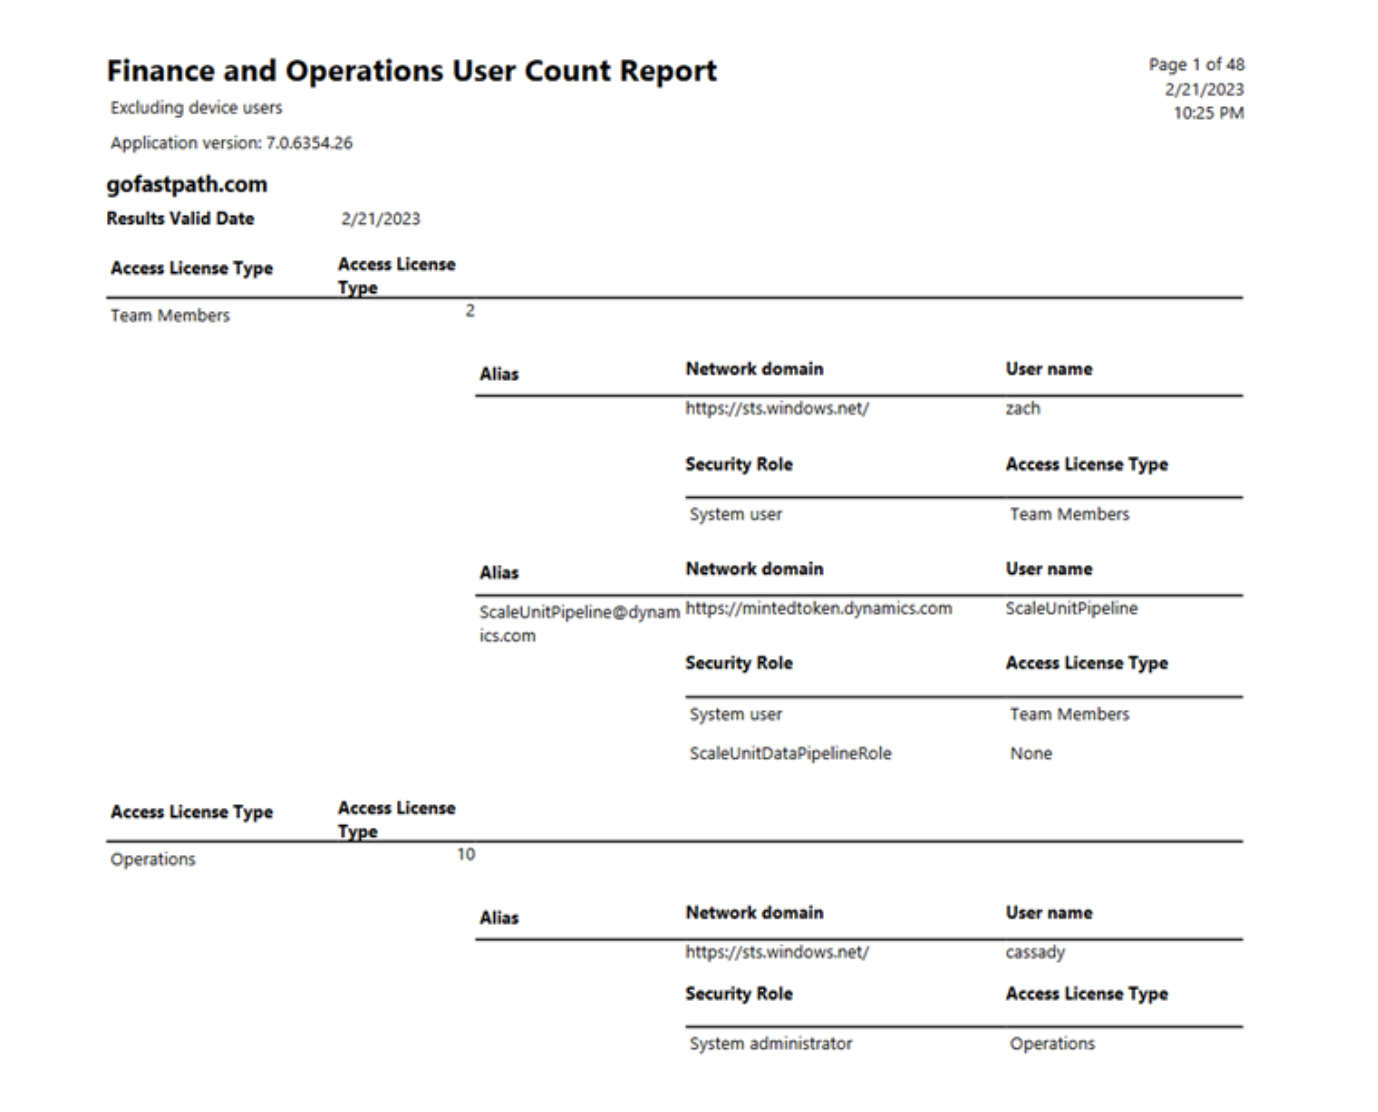
There are a few reports available natively within D365FO to help with determining the licensing requirements of its users.
The first is the User License Counts report which is available at System Administration -> Inquiries -> License -> User License Counts. This report shows each user in the system and the ‘entry point-based license’ requirements for each user based on their role assignments.
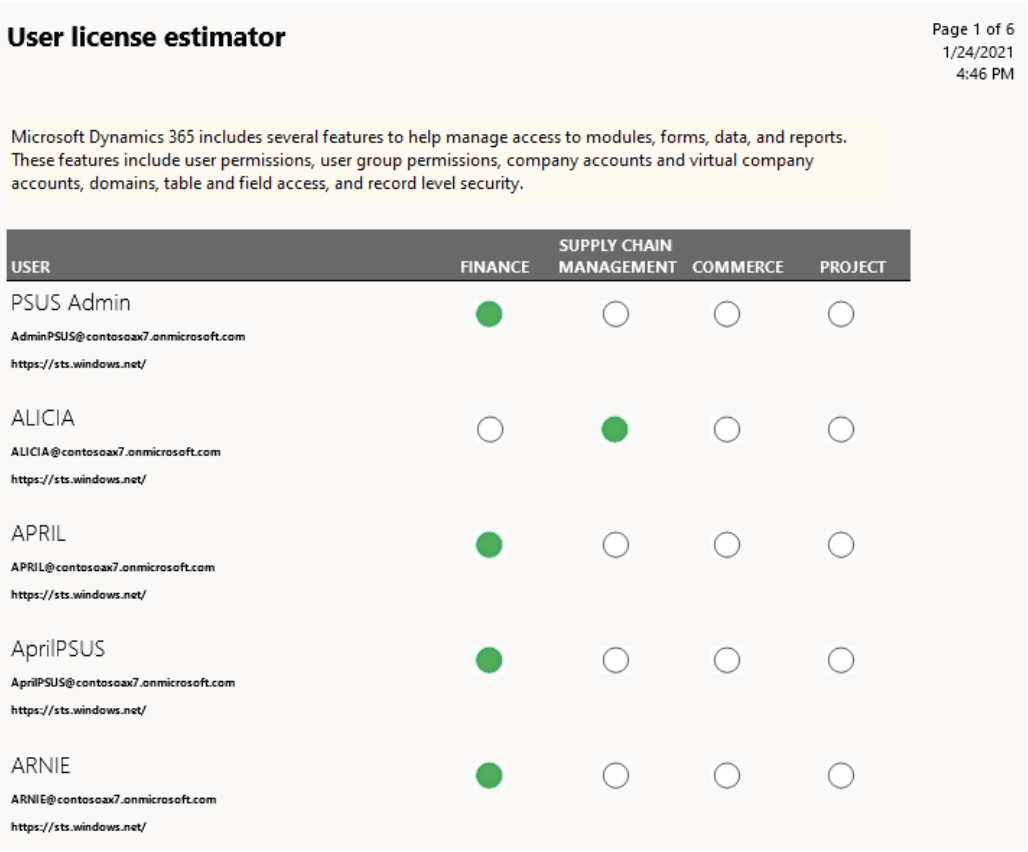
The second report is the ‘User License Estimator’ report, which shows the ‘privilege based license’ requirements for the user. This report is available at System Administration -> Inquiries -> License Reports -> User License Estimator.
The best way to reduce your license requirements is to apply ‘Least Privilege Security’, which is the process of ensuring that users are not provisioned with too much access within D365FO as well as performing periodic license reviews.
With the move to consolidate Dynamics 365 offerings under one solution (as we looked at in our previous blog post), how could this potentially impact licensing? That remains to be seen as we are very early in the process of combining platforms, but I do think that it will impact the licensing methodology used.
Yes! Then list all of the blogs, whitepapers, YouTube videos I’ve created over the years about licensing.
In this article, we show how XDS will react in certain scenarios and how you could approach more complex business use cases for XDS.
For each scenario below, the setup required for each instance will be listed. For all tests, I did a full compile as well as a database sync of my test project, I then logged out and logged back into D365FO as my test user.
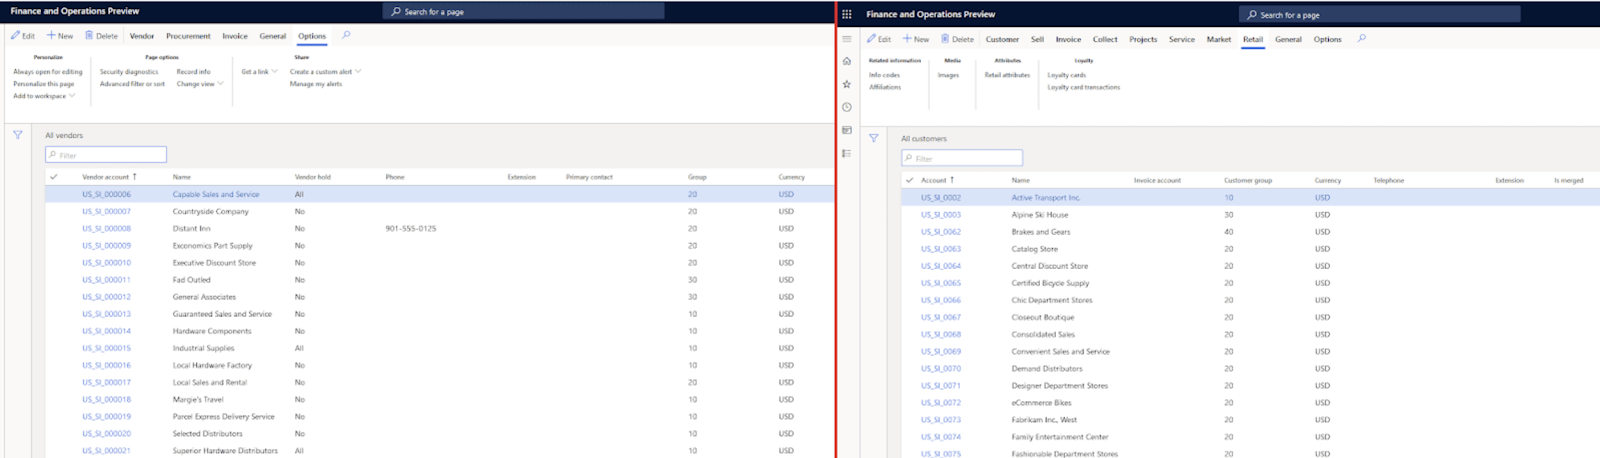
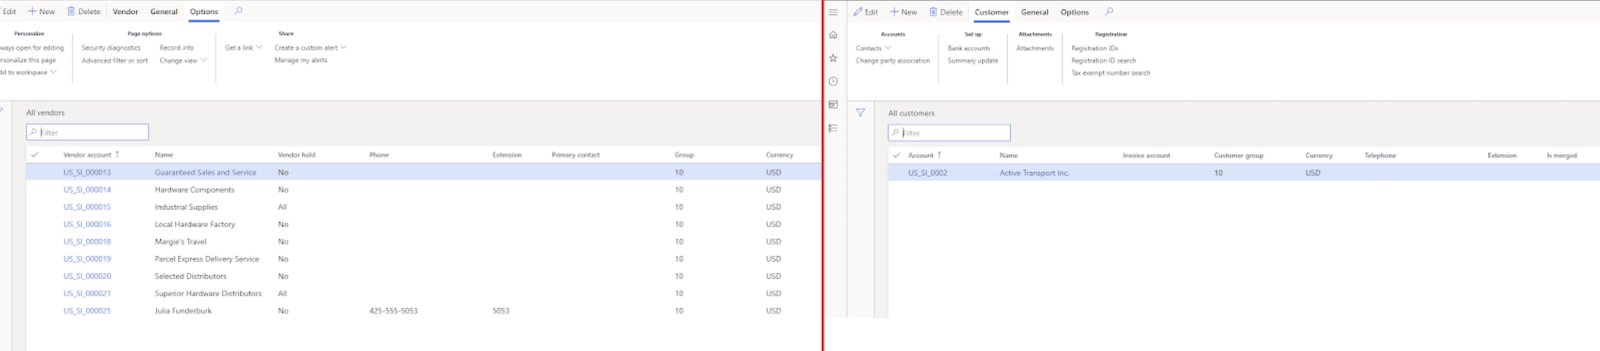
For my test scenario, I want a role to only be able to interact with Customers and Vendors that have a group (CustGroup/VendGroup) equal to 10. The first thing I did was to create a role that allows full control of both customers and vendors. Here is what the test user sees when assigned this role:
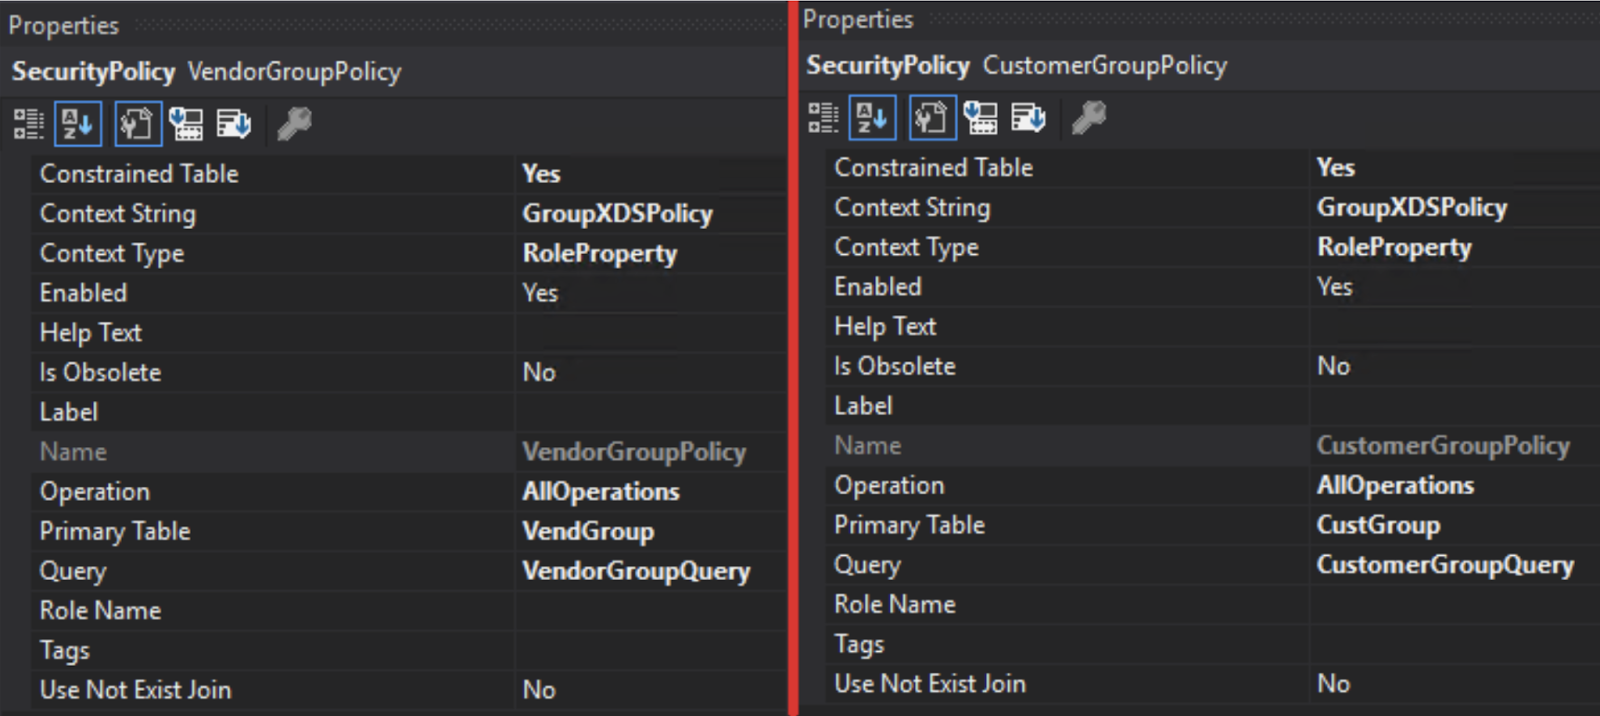
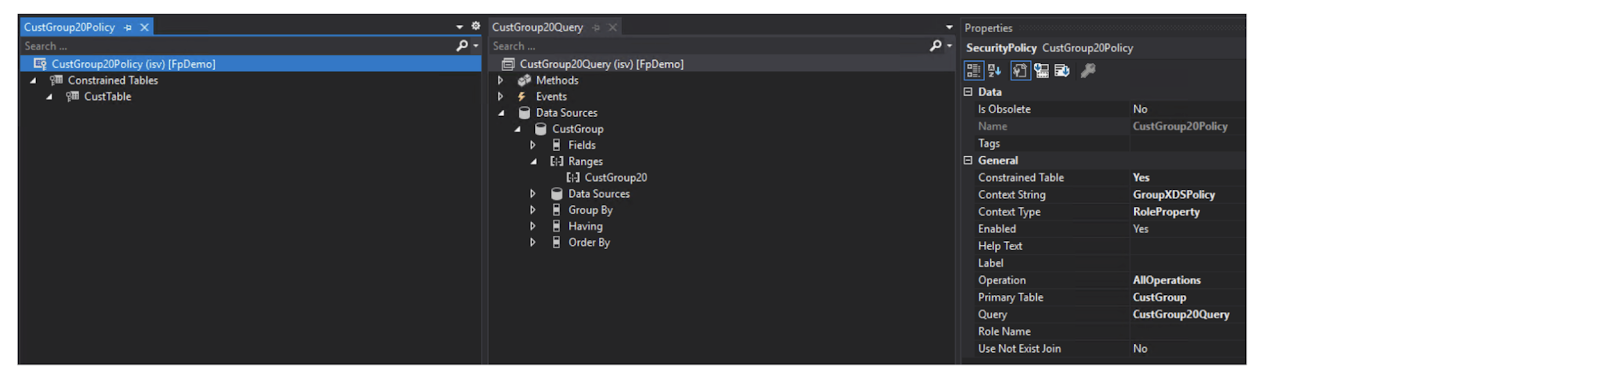
To implement the XDS policies, I first created the Customer and Vendor queries:

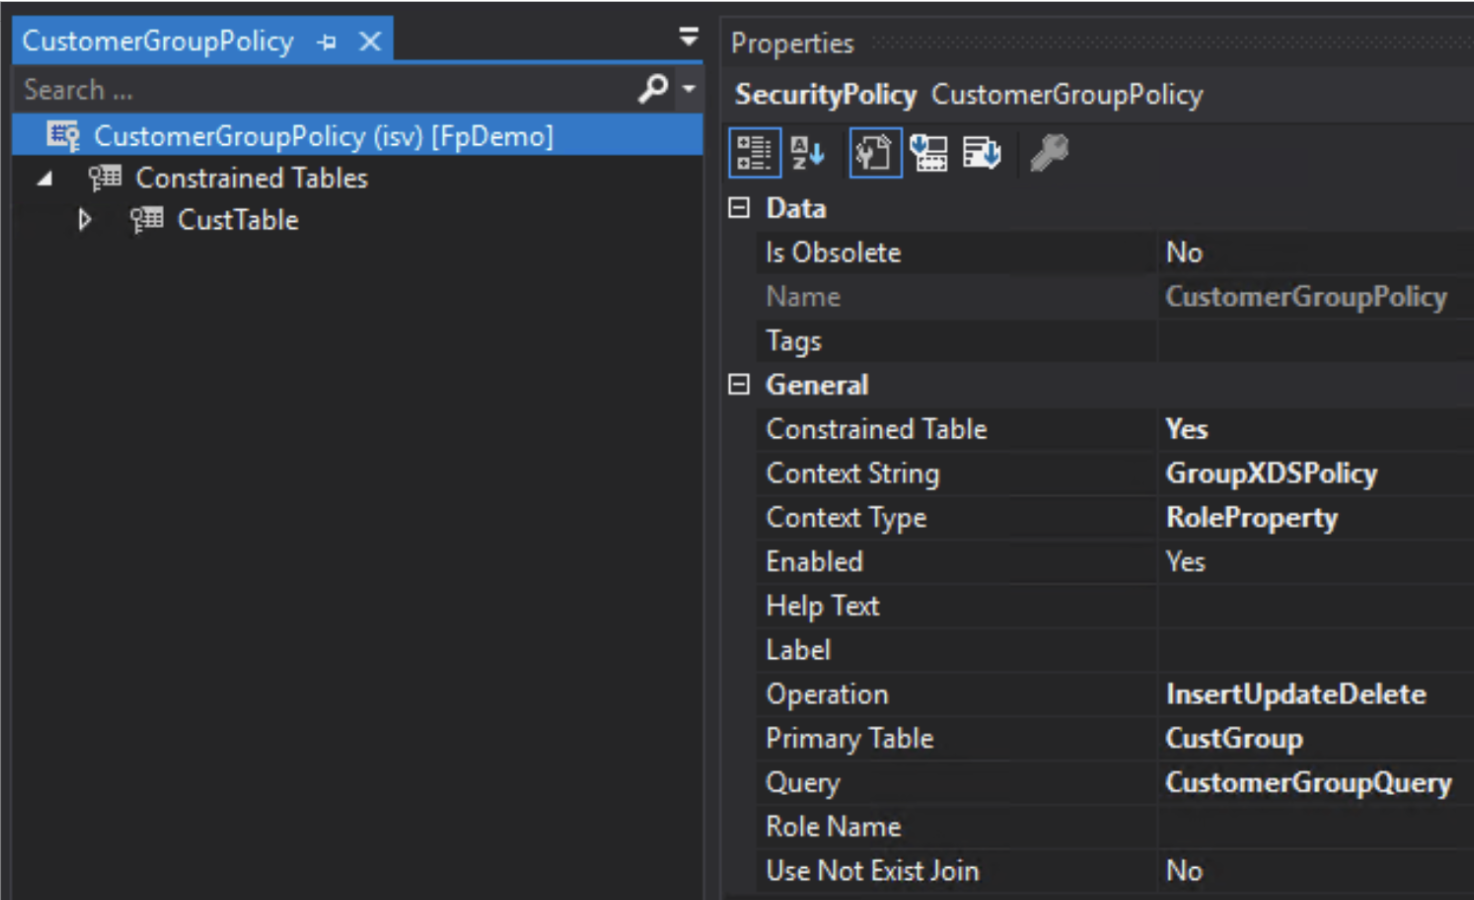
I then create the security policies for these queries. A couple things to note here:
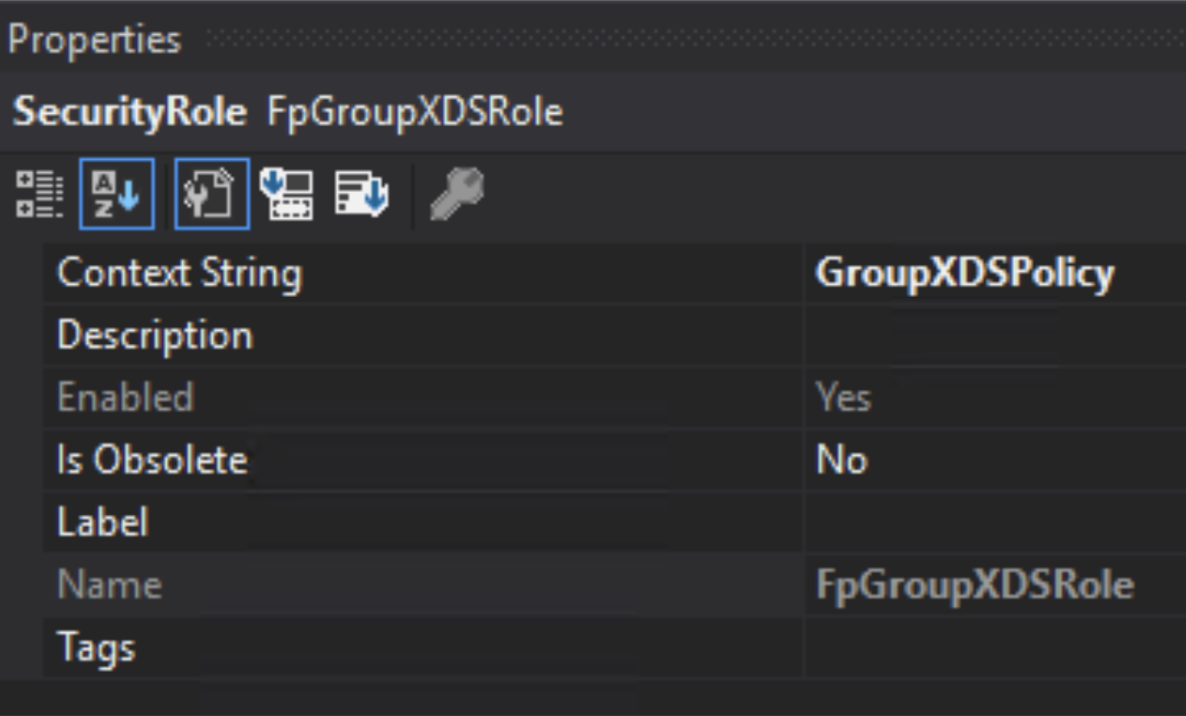
I then created a role (FpGroupXDSRole) that I assigned the appropriate duties too, notice here that I set the Context String to the same string as my security policies (GroupXDSPolicy). This will apply both XDS policies to this role.
Once this role is assigned to the user, we can see that both policies are applied successfully.
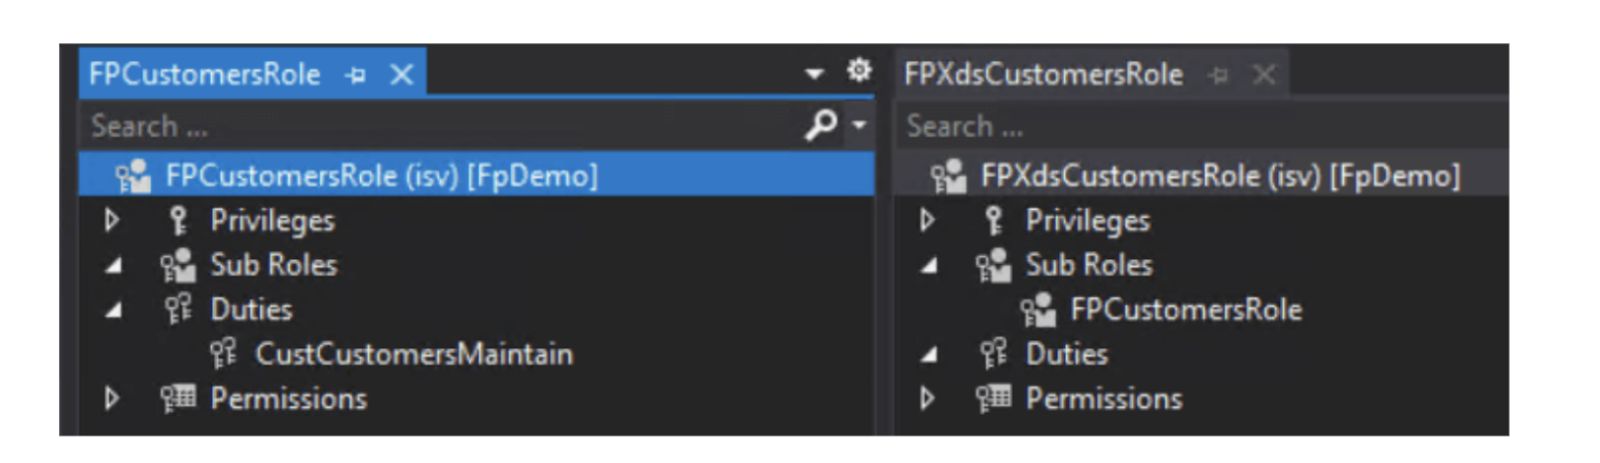
In my test from above, I created the role via the AOT. I also wanted to ensure that a role created from the user interface also works as expected. So I created a role in the Security Configuration area of D365FO and made sure to set the Security Policy Context String to the same string as before (GroupXDSPolicy).
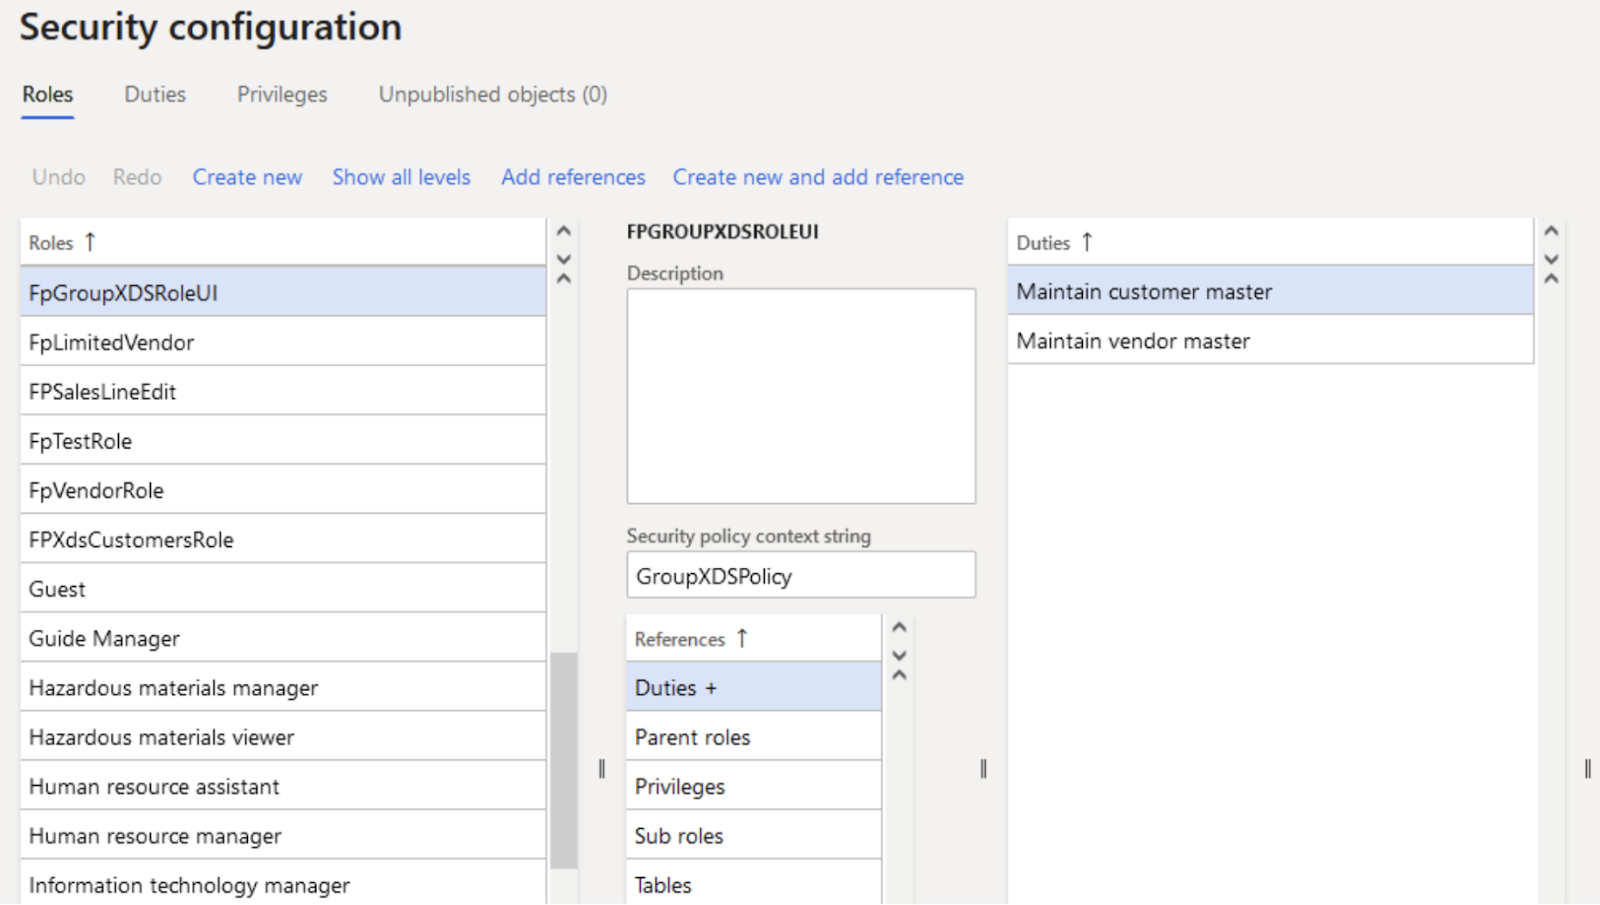
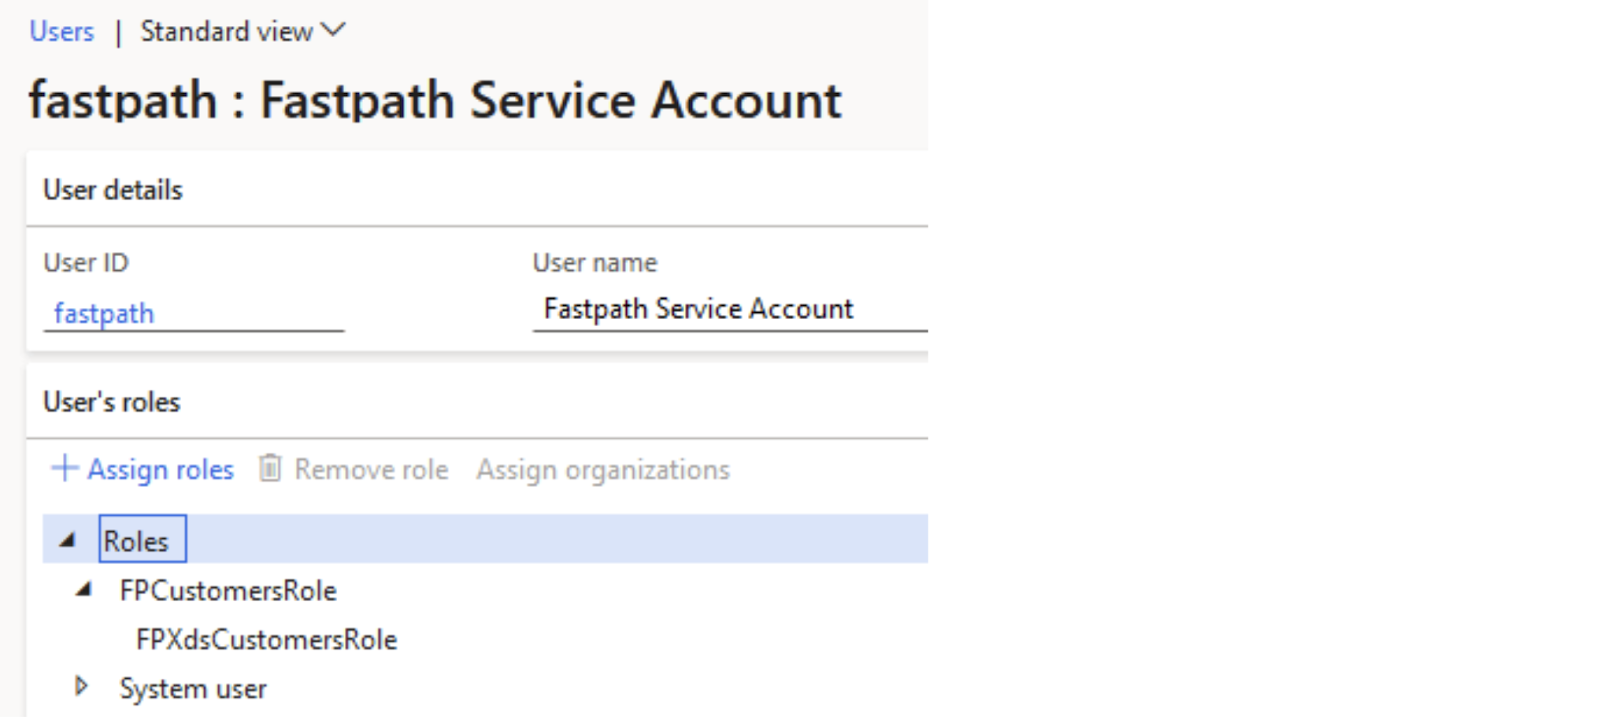
We will have two roles: FPCustomersRole and FPXdsCustomersRole, both of which will be assigned the CustCustomersMaintain duty which give access to maintain customer records.

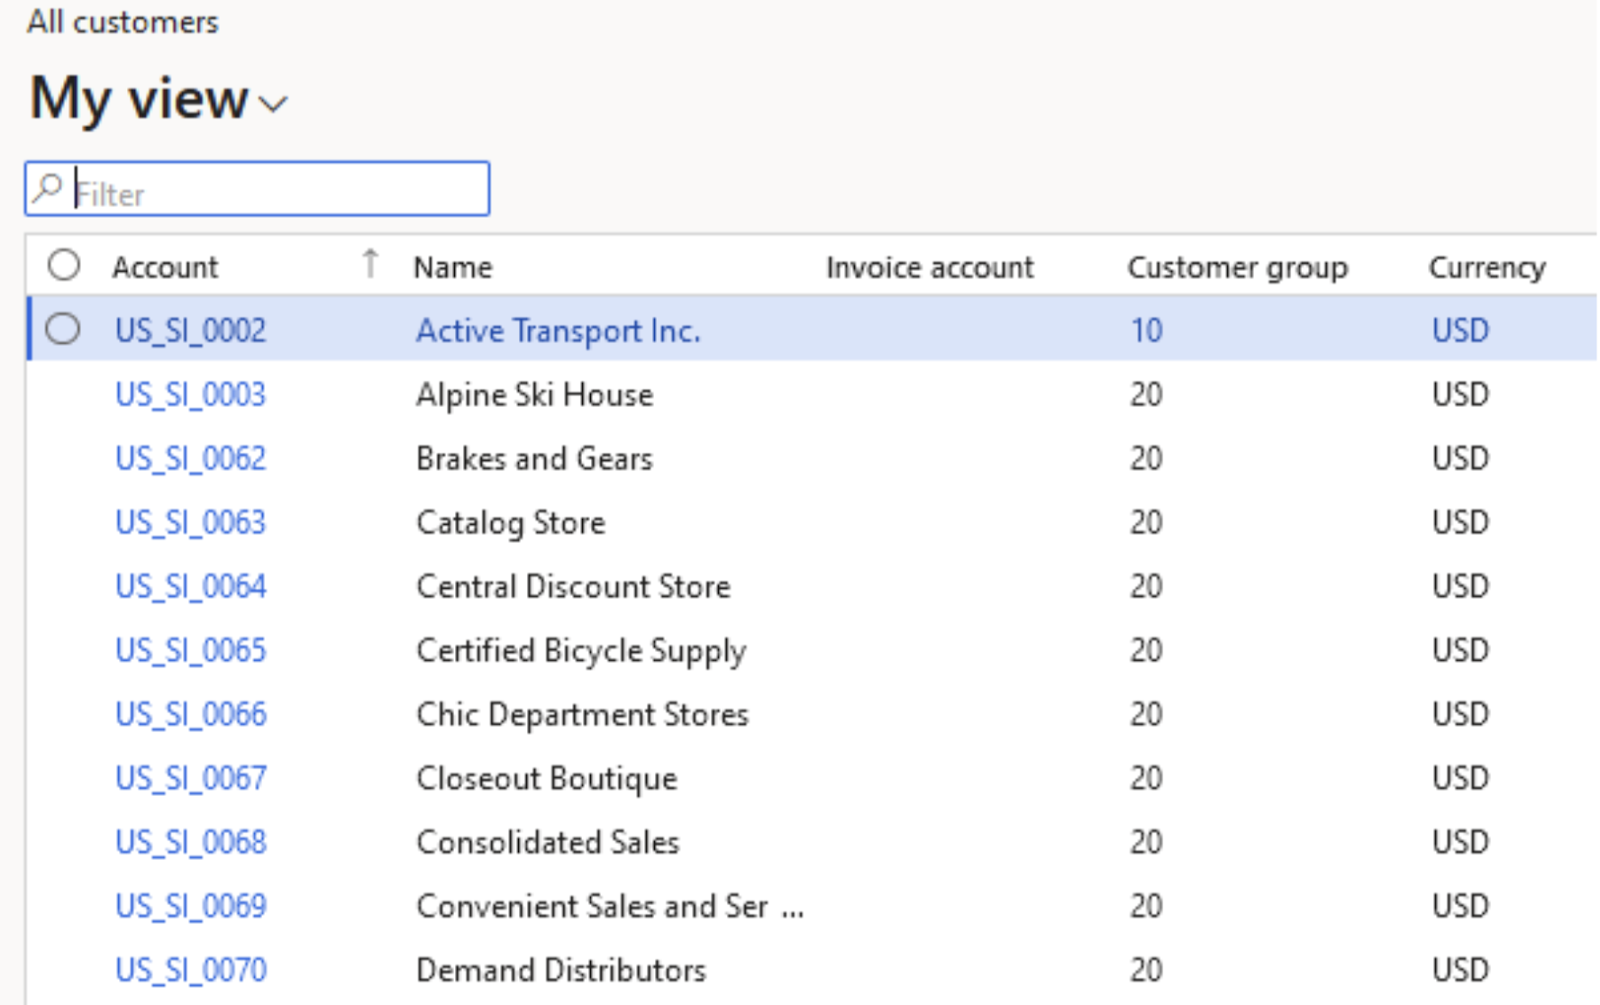
With the FPCustomersRole assigned to our test user, the user can see all customer records:
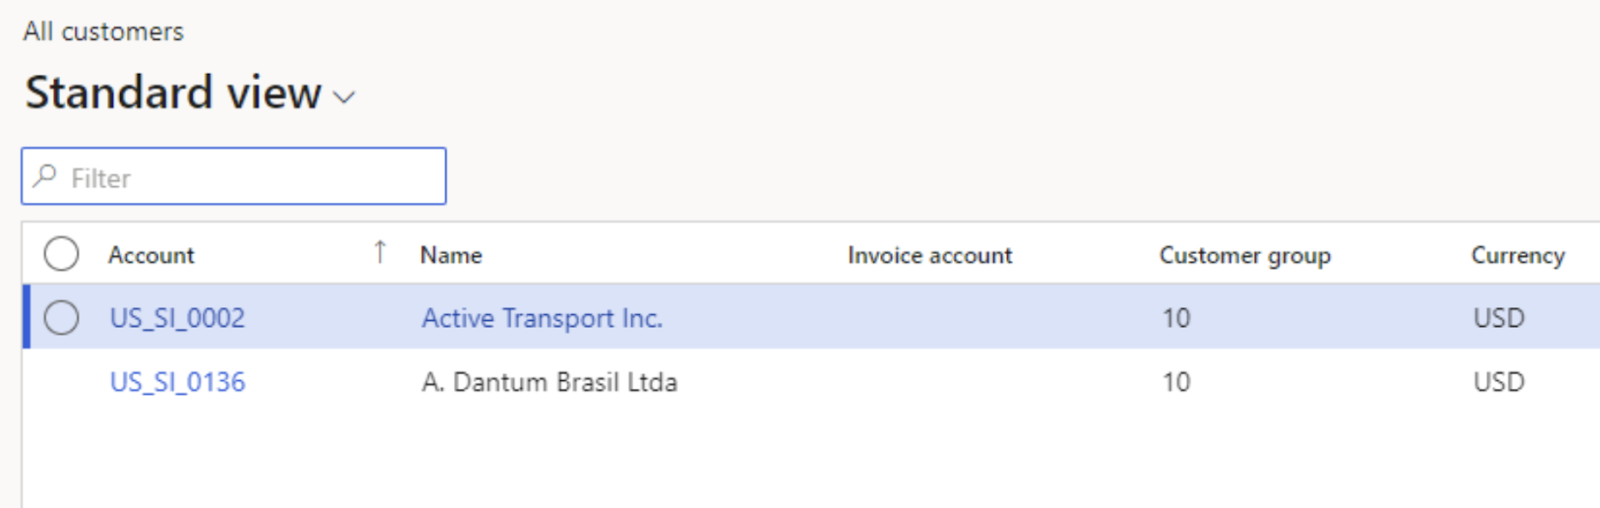
The FPXdsCustomersRole has an XDS policy applied to only show customers with a CustGroup of 10. With the FPXdsCustomersRole applied, our test user can only see those customers with a CustGroup of 10:
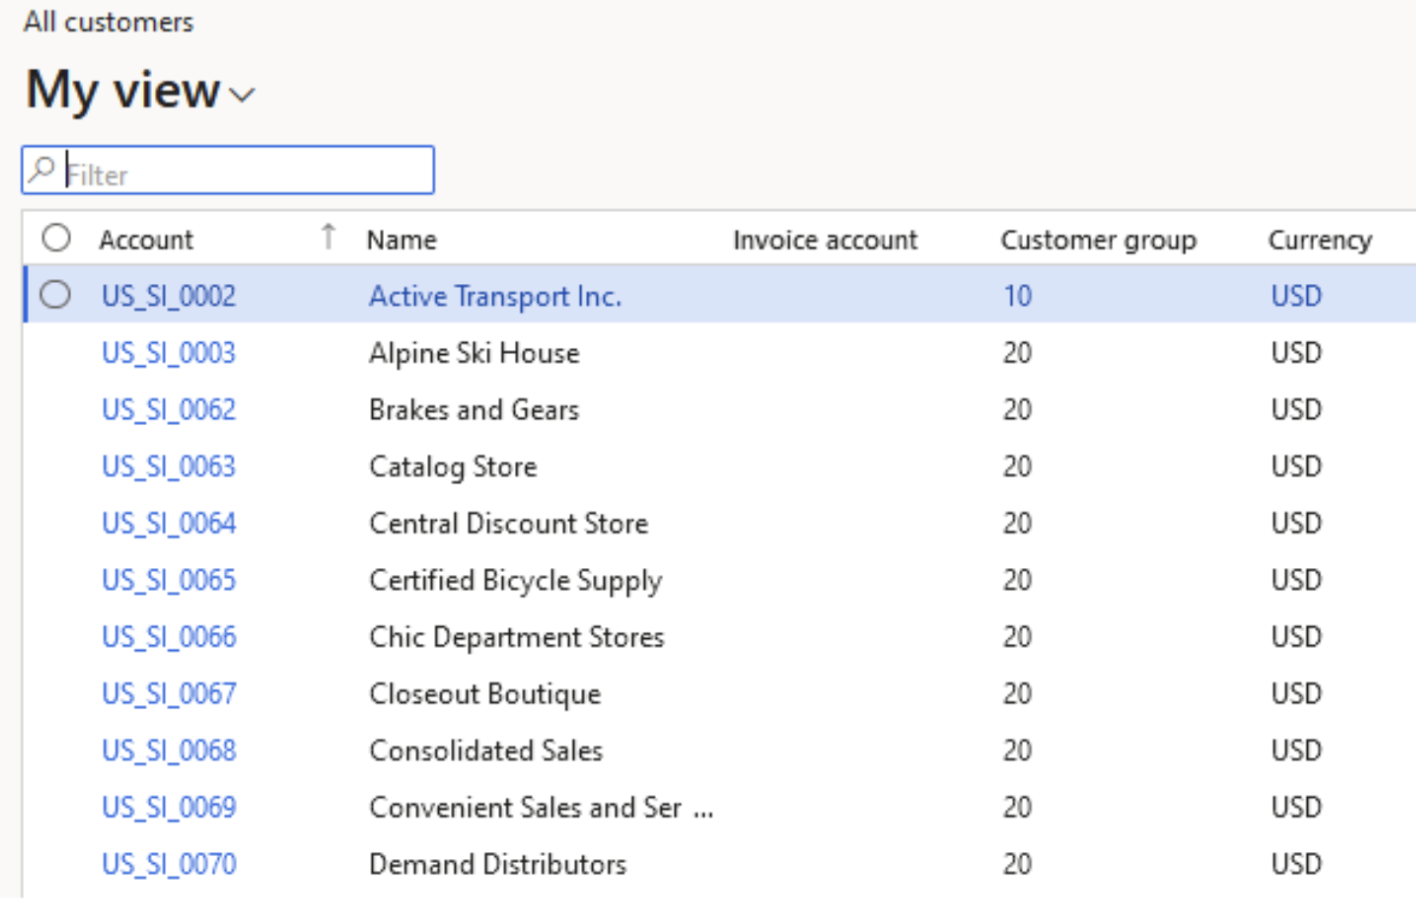
If we apply for the roles with the FPCustomersRole being the base role and the FPXdsCustomersRole being the sub role (so the role with XDS applied to be the sub role):
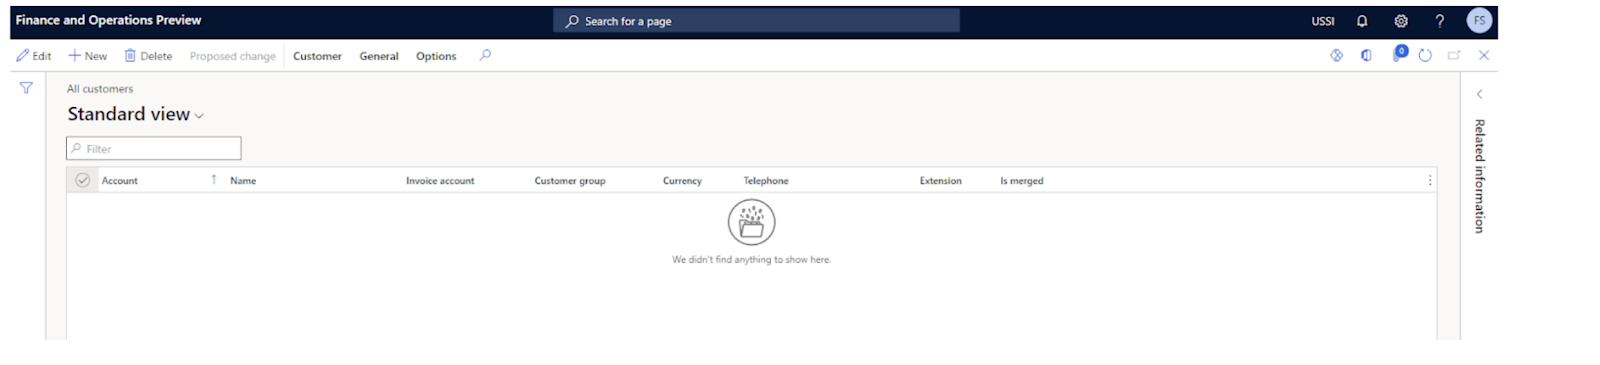
We get an interesting outcome, our test user can see all customers:
This means that the XDS policy is not being applied.
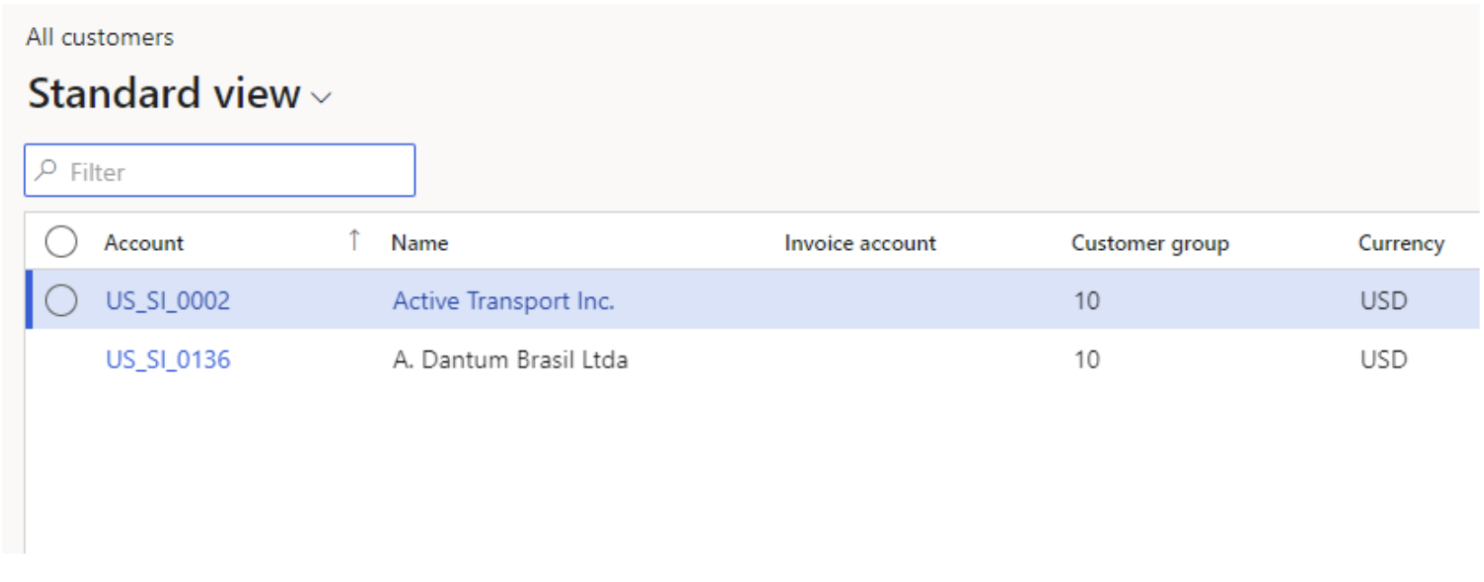
What happens if we reverse it and have the XDS role being the base role and the normal role being the subrole?
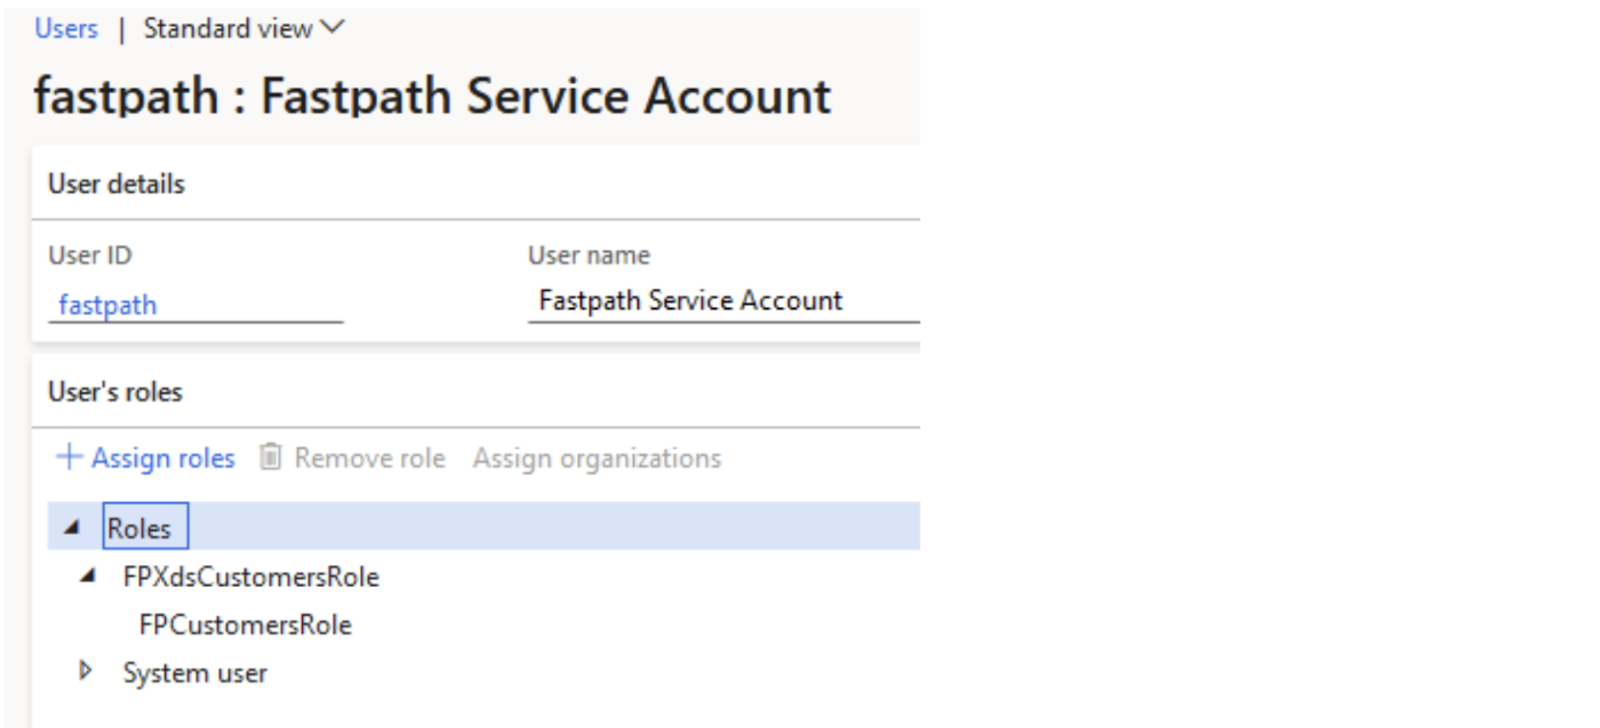
Now the XDS policy is applied correctly:
This idea also works if the base role has no permissions directly assigned to it but has the normal role as a subrole. This type of scenario would be beneficial if one set of users should have XDS applied and another set of users should not, you can control access for both groups with one underlying role and control the XDS portion by creating parent roles with their context string set to the XDS policy that should be applied:
XDS cannot be applied as a sub-role to another role, however, a normal role can be a sub-role to a role with XDS applied and it will function correctly.
In the previous scenarios, I have always set the Operation parameter for a security policy to ‘AllOperations’ but there are other options. One of those is ‘InsertUpdateDelete’, which means that the XDS policy will only apply to those SQL operations:
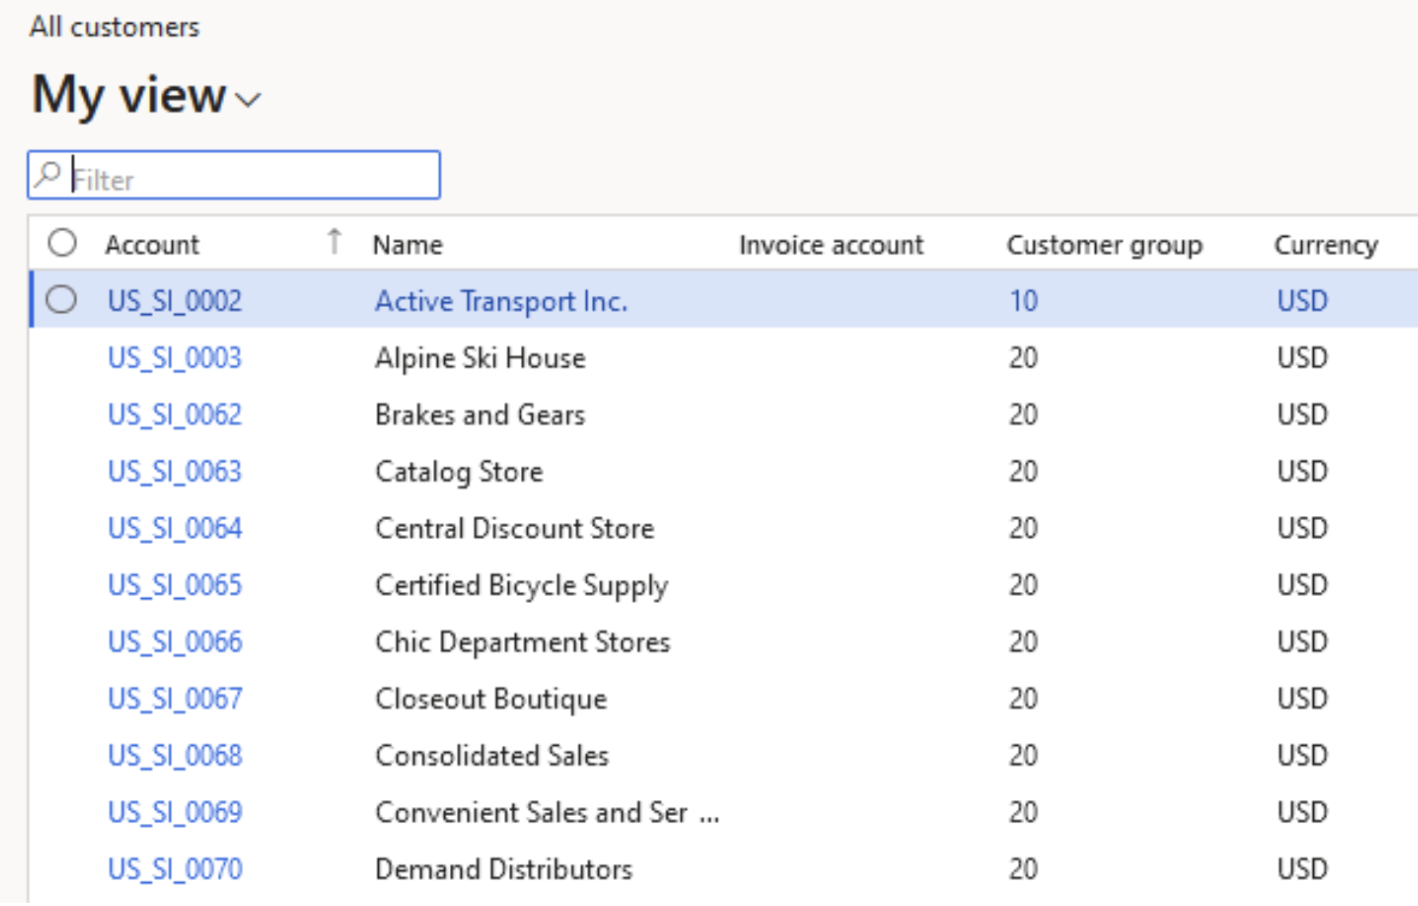
If we apply this security policy to a role and assign it to a user and load the All Customers form we can see all of the customers:
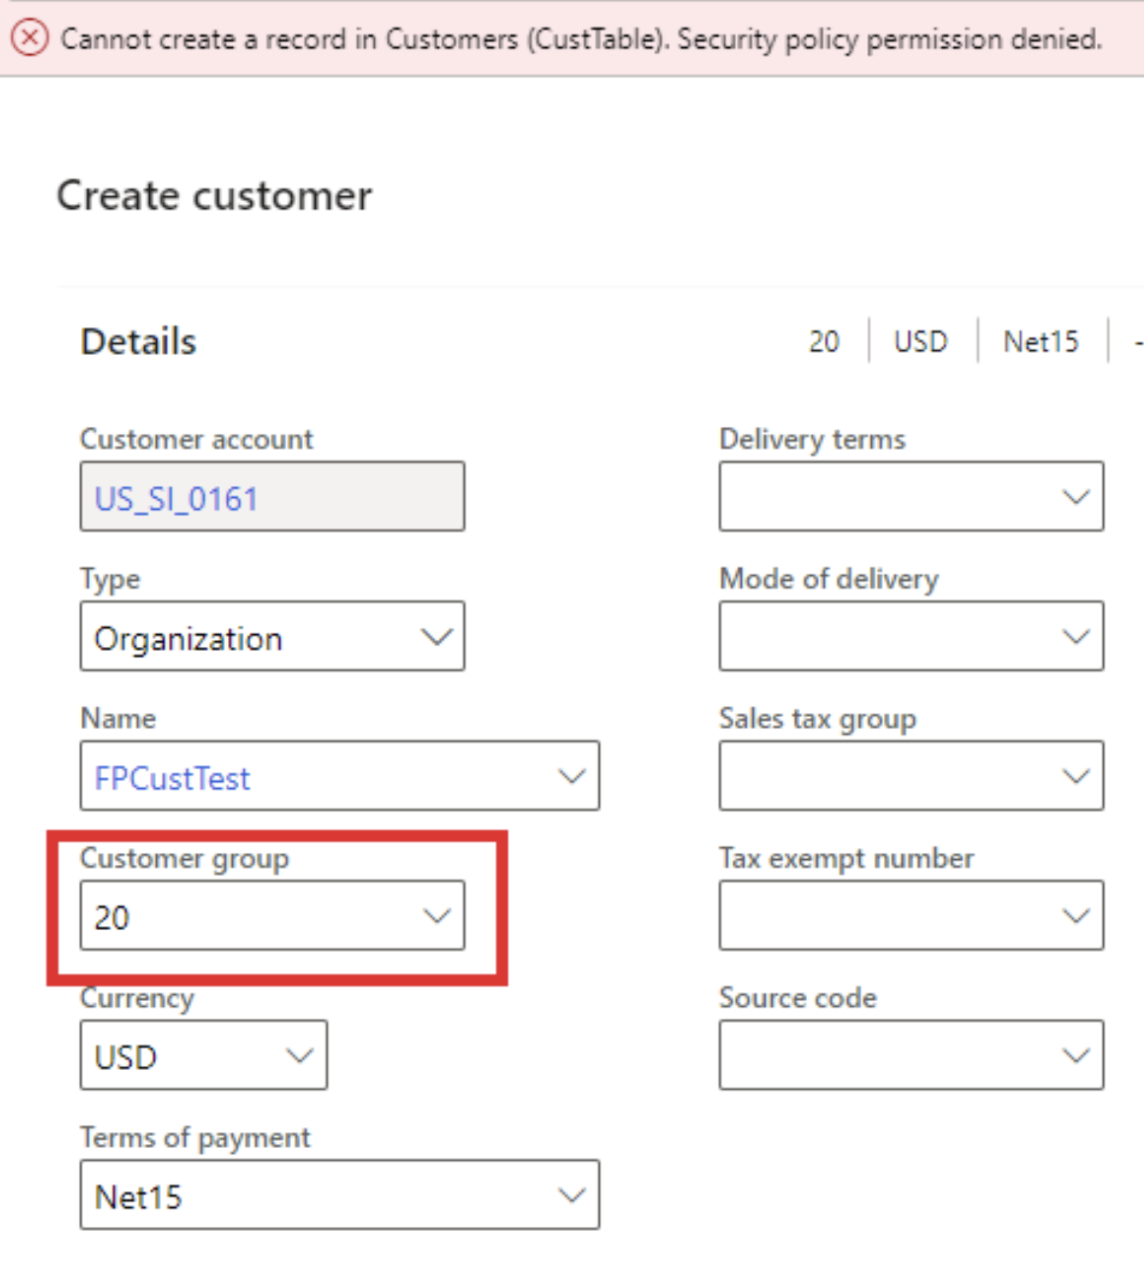
However this is what happens if you try to create a customer with a CustGroup other than 10:
And here is what happens if you try to edit a record with a CustGroup other than 10:
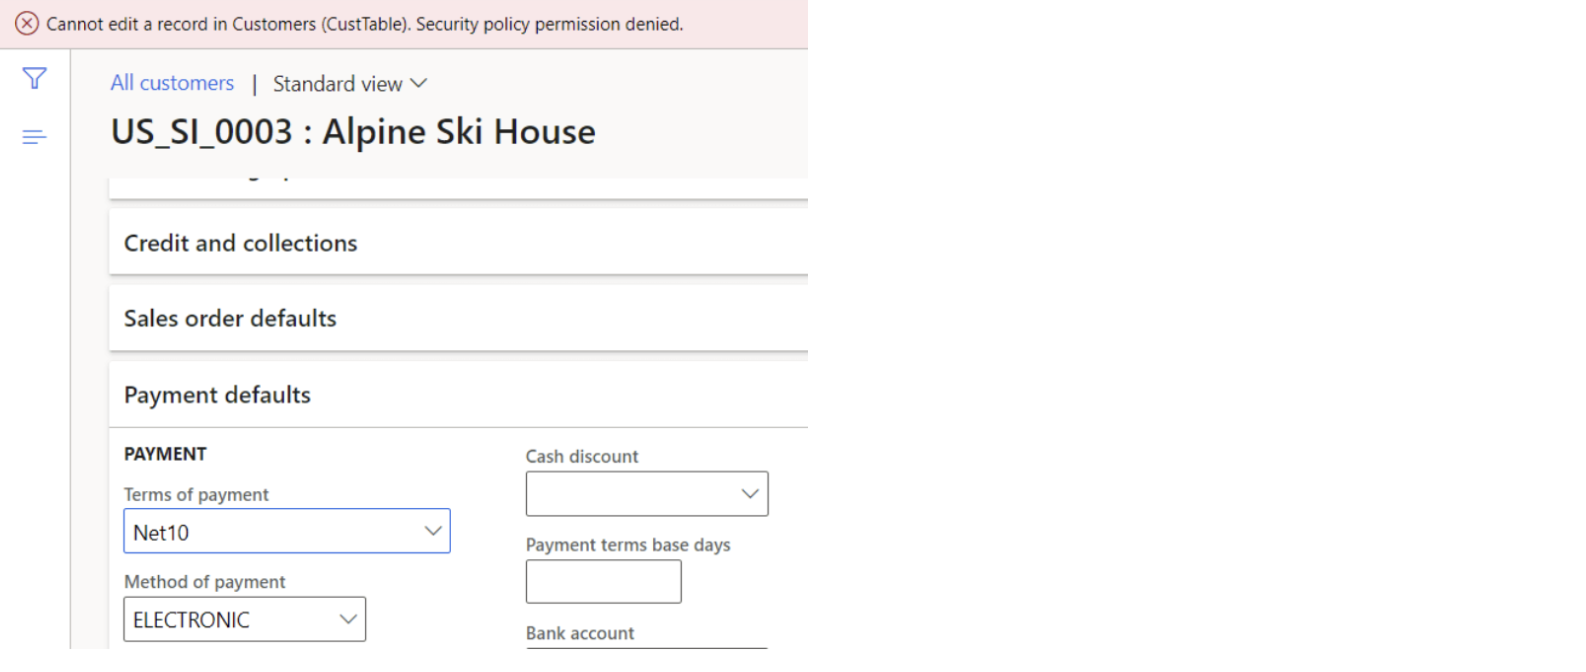
And here is what happens if you try to delete a customer with a CustGroup of 10:
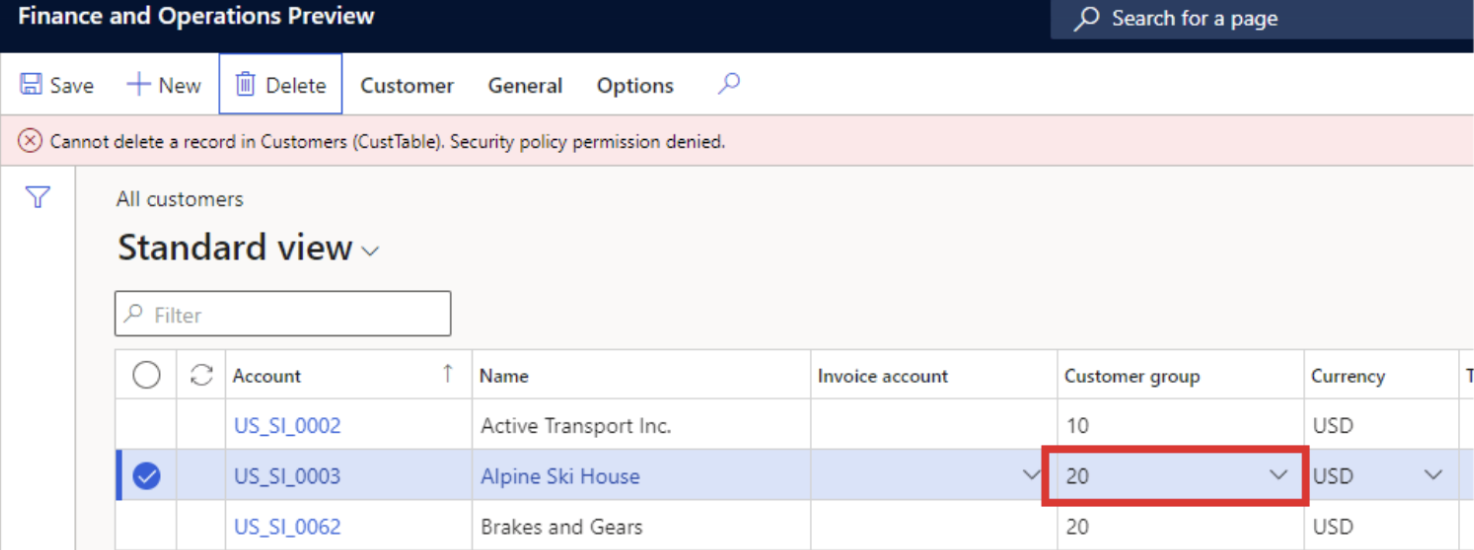
So, you do have the ability to see all objects but only Update, Create, or Delete objects with a specified parameter defined in the security policy.
Let’s use a combination of our CustGroup = 10 security policy and add in a CustGroup = 20 security policy and apply both policies to the same role via security context.
So now if we apply both to the role and assign it to the user we can see that the XDS scenarios are AND’d together as no customers are returned.
The above scenarios show how XDS reacts to different configurations within your D365FO environment. Be on the look out in the future as we look at how to perform XDS when there is not a current primary table to use.